How to Import UTM data to your Salesforce Campaigns

You’ve dutifully added Google Analytics Campaign UTM tags to your Google Adwords URLs, Facebook advertising, email newsletter links, and more.

utm_campaign=FBApril2018&utm_source=Facebook&…

As soon as visitors click through to your web site, you can see the Campaign data starting to populate into Google Analytics.

But wouldn’t it be more useful to see that data in Salesforce, where you manage all your marketing and sales efforts?

Now there is a way to see your Google Campaign data from UTM tags right in your Salesforce Campaigns.

The CloudAmp Analytics Dashboards AppExchange app, which syncs Google Analytics metrics into Salesforce automatically, recently added a UTM Campaign import feature. Just enter the utm_campaign name into a field on your Salesforce Campaign record, and get both historical data and daily updates brought in from Google Analytics.

See how many users, sessions, page views and more each one of your Salesforce Campaigns is generating. Data is shown both as totals and daily records, so you can use the richness of Salesforce’s reports and dashboards to understand your campaign trends (prebuilt reports and a dashboard are already provided with the app for your usage).

Each Salesforce campaign can now show the Google Analytics campaign data, right on its page in Salesforce.

Update your Salesforce Web-to-Lead forms

If your web site forms are posting Leads to Salesforce, and you are using the Salesforce-provided Web-to-Lead html code, you need to update your web site by November 17, 2017. If you do not, you will no longer receive new leads from Salesforce.

How do I know if I am using Salesforce’s Web-to-Lead code?

If you generated your form code by going to Setup | Build | Customize | Leads | Web-to-Lead | “Create Web-to-Lead”, or the existing forms on your web site begin with the following code:

<form action="https://www.salesforce.com/servlet/servlet.WebToLead?encoding=UTF-8" method="POST">

then you need to make this update.

If you have a custom-built form, ask your developer.

Form vendors such as Gravity Forms and Form Assembly should have made the changes to their systems to support the new endpoint already.

How do I update my web site?

1. For any forms on your website that are Web-to-Lead forms, search the website HTML code for this code snippet:

https://www.salesforce.com/servlet/servlet.WebToLead


2. Replace the “www” with “webto” so that the “form action” URLs in the Web-to-Lead HTML code display as such:

https://webto.salesforce.com/servlet/servlet.WebToLead


3. Beyond just your “Contact Us” page or any inquiry forms, don’t forget to update landing page forms if you have them.

4. TEST! Submit at least 1 test lead in every form, and check the results in Salesforce.

Only the web address to submit leads to is changing, so everything should continue working as before, but it is best to check in case a typo was made.

Why do I need to do this?

Salesforce will no longer be redirecting API calls to its www.salesforce.com endpoint, since this is used for its main web site. The new endpoint URL (webto.salesforce.com)  is already available, so updating as soon as possible is recommended to improve the performance and avoid the chances of losing any precious leads.

Note that if you have test forms that are pointing to Salesforce Sandboxes, no changes need to be made to those.

For more information, you can see Salesforce’s documentation on the web-to-lead changes.

Questions about Salesforce leads, forms, etc.?

Post any questions in the comments below and we’d be glad to help. Salesforce lead tracking is what CloudAmp is all about.


How to Track Multi-touch Attribution in Salesforce

One of the most important aspects of marketing online is understanding the effectiveness of your different channels. Google Adwords, organic search / SEO, blog posts, webinars, email newsletters, and many more — all of these can be tracked if you are using the right tools, but your leads are not just coming in via one channel.

Frequently your prospects have interacted with multiple channels online before submitting a form and becoming a lead in Salesforce. These days most buyers are able to do fairly detailed research on their own before ever making contact and identifying themselves, so this trend is only intensifying.

Therefore, at a minimum you will see many leads who originally found you from Google Adwords or another advertisement, and sometime later remembered your company or ran across some of your great content and found you via an organic search, before becoming a lead in Salesforce.

Multi-touch attribution is the term for allocating credit across your marketing channels, to help estimate the impact each different channel had in delivering a lead, rather than just giving a single source all the credit. There are a number of different ways of doing attribution, from relatively straightforward to formulas and algorithms so complicated you’ll need to retake algebra. But most of them are better than single-touch attribution, meaning allocating 100% of the credit to a single way that a prospect came to your web site, when they really visited your site multiple times from different sources.

CloudAmp’s Campaign Tracker, a Salesforce app which helps marketers track sources, keywords and campaign effectiveness, is proud to introduce multi-touch attribution in our new Version 2.4. Now you can know both the First Touch (original source of how they found you) and Last Touch (final source that brought them to your site when they submitted a form) on all Leads that go into Salesforce via your web forms, in addition to the other data such as which pages a lead viewed on your site.

Having both First Touch and Last Touch data on all of your Salesforce leads is a straightforward and uncomplicated way to handle multi-touch attribution, yet for most customers provides a very effective way of allocating and understanding marketing effectiveness across your various campaigns and channels.

And once the First and Last Touch tracking data is part of a lead in Salesforce, the attribution data moves through Salesforce’s conversion process to the Account / Contact / Opportunity. So your multi-touch attribution data survives to the converted lead, pipeline, and closed won opportunity to directly relate to revenue.

Find out more by contacting us, or sign up for a 15 day free trial of the Campaign Tracker on the Salesforce AppExchange.


How to See What Web Pages a Lead Visited

When new leads come into Salesforce from the forms on your web site, do you wish you could know more about them than just the data they volunteered? Not only where they came from and how they found you, but maybe some hints about which of your products or services they are most interested in, and what parts of your web site they spent the most time on?

In this post we show how to use the Campaign Tracker, a Salesforce app available on the AppExchange, to quickly and easily show you which pages on your web site a lead visited before they submitted that contact us form.

Why Track Pages Visited?

In Campaign Tracker 2.0, CloudAmp introduced a new feature called Visitor Sessions, which shows you how many times a lead visited your site, which pages they viewed, and when.

The capability was not driven by a desire to be “big brother” or collect data for data’s sake. Instead it was requested by many of our customers, who wanted to be able to better engage with their prospects, and get a bit of a head start in serving the leads who came in to Salesforce.

Campaign Tracker already provided the initial source, keywords, and campaign information about how a lead found a web site, but our customers wanted to answer questions such as:

  • How many times did a lead come to the site before submitting a form?
  • How many pages on the web site did the lead look at?
  • What product(s) was the lead interested in?
  • Did the lead consume a lot of content, or did they just quickly click the contact form?
  • Is this lead in the early research phase, just viewing a few high-level pages?
  • Is this lead in a later buying stage, looking at documentation and other specialized pages?
  • Is this lead unqualified (eg. only looked at jobs page)?
  • What else can we infer from the pages this lead visited on the site, before we call or email to follow up with the lead?

How to Track a Lead’s Web Page Visits

Getting started recording which pages a lead visited on your web site is pretty straightforward. The Campaign Tracker has a free 15 day trial, after which it is available month to month for a low subscription cost (annual plans available for a discount). Install the Campaign Tracker from the AppExchange into Salesforce and configure a few things, then add some tracking code to the bottom of the pages of your web site, and you’ll be collecting data.

When a lead submits a form on your web site that goes into Salesforce (Salesforce web-to-lead or other form technology), along with the original source tracking data (keywords, referrer, etc.) a list of the pages, URLs, and timestamps of pages on your web site will also be submitted in the background, and inserted into the correct fields in Salesforce.


Using Visitor Sessions in Salesforce

Each Visitor Session record that the Campaign Tracker saves into Salesforce shows the details of a particular page that the lead visited on your web site. It shows the Page Title, Page URL, Session Number (was this the lead’s first or second visit, etc.), and a date / time stamp of when they landed on that web page. Viewing these records in the related list on the Lead page, you can get a general understanding of the following:

  • the path the lead took through your web site
  • which pages the lead visited
  • what pages the lead spent the most time on
  • what products / services the lead might be interested in
  • what concerns the lead might have (price, security, customer reviews, etc.)
  • what the lead looked at on repeat visits (if they returned more than once before submitting a form into Salesforce)

You can also retain this data as you move the lead through the sales process. When you convert a lead to an Account in Salesforce (with related Contact and Opportunity), the Visitor Sessions stay with the Contact, so you retain the record of which pages on your web site the Salesforce contact visited before they filled out your form.

In addition, you can get some aggregate data about the most popular pages on your web site, at least as far as those who become leads in Salesforce. It is a limited but potentially important metric, and one more more data point to add to what you learn from Google Analytics or other web analytics tools you may use.

Campaign Tracker 2.0 Now Live

CloudAmp is pleased to announce the release of Campaign Tracker 2.0, the Salesforce app which lets you track Google Adwords, keywords, and other source data into your Salesforce leads. Campaign Tracker has always been the simplest and best way of tracking your advertising ROI and marketing analytics in Salesforce, and now with the release of version 2.0 it is even better.

Visitor Sessions

New in Campaign Tracker 2.0 is the ability to see which pages on your web site a lead visited before they submitted a lead form. Called Visitor Sessions, this new feature is available right in individual leads and contacts within Salesforce for easy reference during the sales process.

See the page titles and URLs in Salesforce of the entire path that a prospect took on your web site. Session numbers even show repeat visits, so your sales and marketing teams can see at a glance what parts of your web site a lead looked at, plus when and where they returned each time they visited your site before they became a lead in Salesforce.

Now with Campaign Tracker 2.0, you can identify which products a lead might be interested in, and understand potential lead value ahead of time — all based on which pages they viewed on your web site.

Better Tracking Technology

Campaign Tracker 2.0 was completely rebuilt from the ground up to make it easier to implement and provide more reliable data collection.

Version 2.0 no longer relies on cookies or data from Google Analytics, so it provides an independent way of verifying lead sources and other information. Plus we’ve simplified the installation process to support pretty much any web site form you might have.


For a FREE 15 day trial, including email and phone support to help you get the Campaign Tracker set up and tested, please sign up on the AppExchange.


Google Analytics Changes: Visits and Unique Visitors now Sessions and Users

Google Analytics rolled out some changes in April 2014 rather quietly, changing the naming of some of their most important metrics. The terminology changes were made to better support Google’s new Universal Analytics, which can measure traffic across both web and apps.

Visits is now Sessions

The first major change is that Google Analytics has changed Visits to be called Sessions. The concept of sessions has always existed in Google Analytics, as a way of measuring actions a visitor takes on your web site within a given timeframe. Google Analytics defaults the session length to 30 minutes, though it can be customized to between 1 minute and 4 hours.

This means that if a user visits different pages on your web site, downloads files etc., and then views more pages several hours later, these are considered separate sessions (and previously would have been labeled as separate visits).


Unique Visitors is now Users

Secondly, the previous app metric Active Users has been combined with the web metric Visitors, and both are now just combined under the same name, Users.

In addition to unifying the reporting across web and app reporting for the new Google Analytics Universal Analytics, it also makes things a bit less confusing as Visits and Visitors often caused confusion since the terms are quite similar. This is why Visitors were generally referred to as Unique Visitors — and now they are Users, which makes more sense still.


5 Big Ways to Maximize Your Salesforce Dashboards

This was originally a guest post on the Salesforce blog.

Dashboards and reports are one of the best parts of Salesforce. In addition to being good looking, modern visualizations of your data that don’t have to be manually updated like spreadsheets, they can really maximize the impact Salesforce has on your organization.

Dashboards can improve communication on your team by allowing everyone centralized access to the latest data. They can also help you understand trends in that data more quickly and easily through charts that automatically update, so you can avoid potential problems and celebrate successes. 

Here are five high-level tips to help you make the most of your Salesforce dashboards.


  1. Agree on Metrics

It seems obvious, but everyone on your team (and ideally in your company) should agree on what the key metrics are that you are going to track on your dashboards. 

  • What are the metrics that define success at every level of your organization?
  • How do the metrics relate to organizational goals?
  • Over what time periods should those metrics be evaluated (monthly, quarterly, etc.)?

Agreement on what to measure is a critical first step. You don’t necessarily have to be on the same page with the types of charts (some people prefer bar charts while others like line graphs), but that also doesn’t hurt for consistency’s sake.


  1. Start with Existing Template

Even if your organization is new to Salesforce, you don’t need to start your dashboards from scratch. You can download a variety of free dashboards from the AppExchange in minutes, and edit them to fit your organization’s data and preferences.

Customizing existing dashboards not only saves you time, but it gives you a baseline of “best practices” of how others have designed their dashboards and created their reports. For more dashboard customization tips, see my How to Customize Salesforce Dashboards blog post.


  1. Have Main KPI / Executive Dashboards

Try to have one primary KPI (key performance indicator) dashboard for your organization, which consolidates key metrics from all across the organization into a single view. And even though Salesforce allows up to 20 charts per dashboard, keep this one simple – maybe 9 or 10 KPIs total, where everything fits “above the fold” (without scrolling down in your web browser).

  • One Main KPI / Executive Dashboard
  • Keep it high level, leave supporting data for other dashboards
  • Avoid information overload with a well designed, simple dashboard

You can also have a main KPI dashboard for each department or executive if you choose, but the important thing is to have one or a very small number of KPI dashboards that everyone in your organization sees as the authoritative measure of performance. Each functional area or department may have many additional dashboards that show the detail behind their different activities that roll up into those KPI dashboards, but those should only be used by those focused on each particular area of work.


  1. Bring other data into Salesforce

One way to really maximize the power and usage of your Salesforce dashboards is to bring in additional data that might not be in Salesforce normally. If your Sales KPIs are in Salesforce, but other operational or business metrics are in reports that haven’t been integrated into Salesforce, your dashboards are not the single source of truth that they should be. Popular data sources are external marketing systems, product usage data, and finance data such as invoices.

  • SnapLogic Integration Cloud provides hundreds of data connectors to enterprise applications
  • Zapier provides simple connections to 250+ software apps to eliminate duplicate data entry

Manually importing data into Salesforce periodically is one workaround, but then the automated updating of the dashboards with the most current data may be impaired. With tools like those above, you can make your Salesforce dashboards the authoritative source for how your organization is performing.


  1. Email Your Dashboards

If you have Salesforce Enterprise Edition or above, as part of scheduling the daily or weekly refresh of your dashboards, you can also set them to sent out via email. These HTML emails look identical to your dashboards in Salesforce, complete with graphics of all the charts right there in your email inbox, which you can still click on to go through to the source report in Salesforce.

  • Set dashboards to automatically refresh and be distributed via email
  • Good for team and executive communication
  • Make dashboard emails part of your daily routine to keep on top of your most critical KPIs

Emailing dashboards is a handy way to share information on a regular basis with team members, as well as with any Salesforce users who may not log in to Salesforce as frequently as they should. And for metrics that you may want to monitor as part of your daily work, such as incoming leads or registrations, starting the day with a cup of coffee and your morning dashboard emails will keep you well in the loop.


Want more on Salesforce Dashboards? Check out our blog post How to Customize Salesforce Dashboards.


        CloudAmp Apps for Salesforce


How to Customize Salesforce Dashboards

In this post I am going to show you how to customize existing Salesforce dashboards, such as those provided in apps you install from the AppExchange, or dashboards you may have inherited from a coworker or Salesforce consultant.

For examples I will be using two of CloudAmp’s own Salesforce apps, but the tips and techniques here are applicable to any Salesforce dashboards and reports.

This post also assumes you have the proper Salesforce permissions to modify Reports and Dashboards, and have some basic familiarity with Salesforce reports. If not, you may want to start with Salesforce’s Reports and Dashboards Implementation trailhead.

With all that out of the way, let’s get started!

Clone / Save As

The first rule of customizing dashboards and reports — and this is especially important if you are new to Salesforce’s reporting capabilities — is to ALWAYS make copies of the dashboards and reports you are modifying. That way you always preserve the original copy, in case you need it later.

For Dashboards, just click the “Clone” button that is above every dashboard. This creates a full copy of the dashboard you can rename and save.

For reports, after you click the “Customize” button, be sure to click “Save As” to make a copy of the report before going any further. This is even more important than cloning dashboards, since a report could be used in one or more dashboards, so modifying a report that you did not create might cause changes you did not expect in dashboards where that report has been used.

Changing Date Ranges or Date Groupings

One of the simplest changes to make in your dashboards is adjusting the date ranges displayed in the charts. Sometimes date ranges are just based on personal preference, but often you need to modify them based on your business. If you measure sales on a monthly basis or want to be able to see the immediate impact of a campaign, you may want to see shorter time periods, but if your sales cycle is long or you want to understand longer term trends, then seeing longer periods makes sense.

To edit the date range in a Dashboard chart, simply click on the chart to get to the underlying report, modify the “Time Frame” drop down, and click “Save As” (you can also do this through the “Customize” button, but Salesforce gives you the option of changing date range without changing the underlying report as well).

Depending on how much data you have of a particular kind, you may also want to change the groupings of the dates. Salesforce Summary or Matrix reports can be grouped by any field in the report, which cause reports to be summarized by those groups — for example, you could group leads by Lead Source, or by Created Date.

When you group by a date field such as Created Date, you have a choice of multiple date ranges to group by — everything from days to years. As you can see by the graphs below, two charts showing identical data look quite different when one changes the grouping from daily to weekly. Changing the grouping to monthly would decrease the number of data points even further. It would smooth out the curve to show the month over month trends more clearly, but for some purposes it might not show enough data (for example, if you had atypical traffic spikes on a particular day, those events would not be visible in the monthly graph).

To change a report date grouping, go to the report and click “Customize”. The groupings are shown in the shaded blue sections. Click the down arrow on the left side, and then select “Group Dates by” and change how you wish the range to appear. If you click “Save”, the dashboard that uses the report should automatically refresh the chart when you return to it. If you click “Save As”, just go to the dashboard and drag the newly named report onto the appropriate chart to update the dashboard.

Remove Charts you don’t need

Some existing Salesforce dashboards will have a number of charts for areas where your company may not have data. For example, the CloudAmp Analytics Dashboards have charts for all 20 goals that you can define in a Google Analytics account, but most organizations only have a few goals set up for their web site.

In these cases, after first cloning the dashboard it is easy to remove unused charts from the dashboard, and reposition the ones that are in use. Simply click “Edit” on a dashboard and click the “x” in the upper right hand corner of the charts you wish to remove. Any charts below will shift up when you delete a chart, so you may have to drag the remaining charts to reposition them as you wish.

Change Chart Types

I prefer line graphs for most of my dashboards, but you may prefer bar charts. Or perhaps your boss just loves pie charts. Depending on the type of data in your report, it may not be advisable (or technically possible) to switch to a certain type of chart, but generally it is quite simple to change a chart type in Salesforce dashboards.

After cloning your dashboard, just click “Edit”. Then go to the “Components” tab in the left hand side, select the type of chart you want, and drag it over where your current chart/report is positioned. That’s it.

Use Charts Elsewhere

A final common task when customizing existing dashboards is the need to add certain charts to other dashboards. You may have an executive dashboard where you may need a certain chart of a key performance indicator (KPI), or be tasked with building a dashboard for the marketing department to review in a weekly meeting, where everyone just wants to see the high level reports.

If you don’t have a pre-existing dashboard, a good way to start is to find a dashboard that has some of what you want, and click the “clone” button (shown above). You can then delete charts you don’t want (also shown above), move some charts around, and you have a good starting point.

To add a chart to a Dashboard, and click “Edit”. Drag the Data Source (report) you want onto the dashboard, then drag the Component (chart type) on top of that to format it (or start with the Component and then the Data Source — it doesn’t matter which one you drag and drop first). You will see a blue box with a dotted line highlight the places you can place the new chart as you drag it.

There are many other options for customizing Salesforce dashboards and reports, but those are some of the basics.


        CloudAmp Apps for Salesforce


CloudAmp Founder David Hecht’s Marketing Presentation at Dreamforce

CloudAmp Founder David Hecht will be giving a talk on online marketing tactics at Salesforce’s annual Dreamforce conference, Wednesday, November 20, 2013 at 3:45 PM in the Hilton SF Union Square, Community Success Zone Theater.

The presentation, entitled “Which Half is Wasted? AppExchange Marketing Best Practices” draws on David’s 18 years of marketing experience to provide an overview of marketing strategy and tactics for driving online signups and app sales.

As part of the Partner User Groups sessions, David will focus his advice toward the ISV community working to promote Salesforce apps, but the tips and tactics will be broadly applicable to marketers of any product or service with an Internet presence. The 30 minute presentation will be divided into two sections, with topics to include:

AppExchange Marketing Tactics

  • Challenges of AppExchange Marketing
  • Search Engine Optimization (SEO)
  • Tracking your traffic (UTM codes and Google Analytics)
  • Blogging (It takes too much time but you have to do it)
  • Social Media (Be part of the conversation when it makes sense)
  • Automated Lead Followup (Use the tools Salesforce gives you)
  • Outbound Phone Calls (Does Sales follow up make sense for you?)

Online Advertising

  • Pros and Cons of Advertising
  • Google Adwords (Not just for conversions but for research)
  • Social Media Advertising (Linkedin, Facebook enable amazing targeting)
  • Retargeting (Remind people who got distracted without signing up)
  • Other Strategies (Email marketing, Vertical Sites, Directories and more)

There will be time for questions during as well as after the brief presentation. If you are coming to Dreamforce this year, please come by and say hello.


The Opportunity of ‘(Not Provided)’ Google Keywords

In late 2011, Google began encrypting searches from anyone logged into a Google service (Gmail, Google +, etc.), so site owners could not see many of the keywords from organic searches that were driving visitors to their sites. In October 2013 Google took additional steps to make search “secure”, so the majority of all keyword searches are now coming through as “(Not Provided)”. The trend is expected to continue until effectively all organic keyword data is blocked from your Google Analytics reports.

This blog post isn’t about Google’s motivation for making this change, or about how to try to recover some of this lost data through other means. You can get some data from Google Webmaster Tools, or hope that a portion of your organic traffic comes from Yahoo and Bing, etc. There are plenty of good articles that cover tips for  that in detail, such as the following:

Instead, I’d like to focus on the opportunites this change provides for website owners and online marketers to go back to the basics and do a better job with some of the fundamentals of tracking. Search engine optimization (SEO) may be forever changed by this major change on Google’s part, but there are many best practices that haven’t changed — and in fact, this (Not Provided) trend makes them more important than ever before.

Opportunity 1: Google Adwords

This may seem to be playing into Google’s hands, since their stated motivation for encrypting the search results was to protect user privacy, but few have believed that.. Since paid advertising on Google still gives you the keyword data, most pundits have assumed the move to “(Not Provided)” for organic search was intended to keep the valuable search data for Google’s own use, and drive people toward paid advertising on Google Adwords and Google +.

However, I have long believed that every business should be doing some amount of Google Adwords experimentation. Even if you don’t have an advertising budget, spending $100+ a month on Google Adwords can provide some of the most cost effective research into your target market available anywhere. Get search volume and keyword data, see what types of ad text and headlines draws the most clicks, and more. Build out your keyword lists for your content marketing, see the keyword data you are no longer going to get from organic search, and hopefully get some conversions as a bonus.

Opportunity 2: Step up your Tracking

Since tracking of organic keywords is mostly if not completely going away in the age of ‘(Not Provided)”, time to step up your game in other areas. Be sure you are tracking everything else you can track, and plug up those gaps that have been on your marketing to-do list for months. Add tracking to your ecommerce, signup and contact us forms to get data on as many of your conversions as possible. (I am not objective in recommending my Campaign Tracker app for this, but please check it out  if you are using Salesforce CRM).  In the end, maximizing conversion tracking is more important than focusing on keywords that brought you clicks and traffic.

In addition, use Google Analytics campaign tags (utm_campaign, utm_source, etc.)  on any links to your site that you give out. Not just in your advertising URLs, but in your social media posts, links you give to your partners to publish on their sties, blog posts, directory listings and profiles, etc. Tagging your URLs will eliminate some of the untracked traffic from other sources (social media sharing or referral sites) and give you more consistent, better data for the incoming link data that you can control.

blogging_sucks_mousepad

Opportunity 3: Back to SEO Basics

Finally, for SEO go back to focusing on the basics — good site structure and good content. Without detailed organic keyword data, you won’t be able to do many of the search engine optimization tricks often promoted by some fly-by-night “we will increase your Google rankings” SEO firms — but you shouldn’t have been doing those things in the first place anyway. Tricks never work for long if they do work, and they can backfire badly.

Instead, accept that your site keyword data is going to be lacking, but use aggregate data from elsewhere — Google Webmaster Tools, Google Adwords — and start producing content that your audience would value. Blogging is very difficult to do regularly, but critical to this back-to-basics approach. Though for most busy professionals with multiple work responsibilities it is nearly impossible to find time to write regular blog posts, not only will they generate positive SEO returns, but they have the added benefit to establishing a voice and thought leadership for your particular field (or at least I hope so!)

What do you think of the Google ‘(Not Provided)’ change? Any tips you think I missed? Let us know in the contents below.


6 Reasons You Need Web Tracking and Analytics Data in Salesforce

If you are doing online marketing and using Salesforce, chances are there is some important information missing from your Salesforce organization. Hopefully you are tracking your web site lead sources into Salesforce (if not, get on it here or read this now). But what about understanding your web site traffic, visitors, etc. directly inside Salesforce? Here are 6 things that you might be missing out on, or at least need to think about.

1. You Need to See the Big Picture

Web site traffic and visitors are the top of your inbound marketing funnel. For many marketers, and especially those of you spending a significant portion of your budget on Google Adwords and other online advertising, this is where most prospects first engage with your brand.

So how many people are on your web site, and where did they come from? You want to be able to see total web site traffic, and the breakdown of the different types of visitors by Campaign, Referral Source, right where all your other marketing and sales data lives — Salesforce. This is the top of your “funnel”, people on your web site, and understanding this big picture and up / down trends will keep you much more on top of how your marketing is performing. Many of us track our leads, but how many keep on top of the big picture and can see those who did not submit a form as well?

Seeing the top of the funnel in Salesforce not only makes this data more front and center, but also gives you the advantage of being able to compare it to trends in the rest of the funnel — how many leads are generated via web forms, how many of those leads convert, etc.

2. Your Conversion Rate Does Not Matter

This isn’t 100% true, it mainly makes a good heading. Target conversion rate matters somewhat, and we can all agree that achieving a 10% conversion rate is better than 5%. But there are some Internet businesses where 0.1% conversion is considered a job well done. Hence the dreaded question from the CEO or other executive, “What should our conversion rate be?”

As marketers, we know we should be measuring conversion rates at multiple points in our funnel. And the main way we are likely to be successful in “moving the needle” of sales and revenue is by making incremental improvements in these conversion rates at multiple places in that funnel (though we may still secretly hope for that one breakout campaign that just buries the Sales department in qualified leads). So the trend in the conversion rate is really more important to understand on a daily basis than the target (though less sexy).

By having web analytics data in Salesforce to better model various conversion points (Web site vistor > Lead, Lead > Converted Lead, Converted Lead > Opportunity, Opportunity > Closed Won and all the Sales process stages in between that are specific to your company or industry), you get one more critical conversion point that is typically missing from Salesforce. And since positive or negative trends in conversion rates are generally more important to doing your daily job as a marketer, having trendlines of web site visitors alongside the leads in your dashboards can be very useful to monitor.


3. Your Web Site is Broken

And I don’t mean those javascript error alerts that no one understands, or Internet Explorer display issues the web developers refuse to fix out of religious protest. Even on the simplest web sites, downtime caused by hosting problems, issues created by new content, or some cutting edge new templating language that looks cool but won’t load properly for half your visitors can be hard to know about quickly enough.

You can get all of this data by logging into Google Analytics, but how many of us do that daily? If the data is in Salesforce, and nicely displayed in dashboards where trends are easier to see, you can be on top of the really big screwups that much faster and save yourself heartache and lost revenue. Even if your overall visitors don’t change too noticeably, seeing the bounce rate suddenly spike or page views per visitor fall precipitously could alert you to a potential problem.

One side benefit, for those of us engaged in lots of online advertising, is that you can (hopefully) spot problems with tracking much quicker as well. When that new landing page goes live, and somehow the template got changed to not include your tracking code, having real-time visibility in Salesforce should let you catch it early (versus running a report at the end of the month and noticing something amiss then, when it is too late to get that tracking data back).

4. Your Lead Data is Dirty

Really, whose isn’t? But this isn’t so much about duplicate leads and other garbage that has plagued almost every Salesforce instance in history ever (and CRM systems in general for decades before Salesforce.com came into existence, but those were harder to get data into generally). It is more about cleaning up your reporting to more accurately reflect the relationship between the top of your funnel (web site visitors) and leads.

Ideally, you want those spikes in web site traffic to parallel spikes in leads, both nicely tracking each other in Salesforce (though they don’t always, as discussed in #5 below). But when there is more divergence than normal, having the complete picture of the top of your funnel can prompt you to dig deeper.

Maybe your inbound lead reporting shouldn’t have those 1500 tradeshow leads that were just imported in the same graph. Or that new Sales Manger hire got clever and somehow imported his “rolodex” via CSV file. Time to set some filters in the reporting and keep the funnel and conversion rates accurately reflecting your online marketing efforts. 

5. Your Quantity is Increasing Over Quality

Sometimes you can’t blame that new Sales Manager or scanner-happy tradeshow booth staff for declines in data. As you ramp up online marketing efforts, the quality of your web site visitors (and possibly leads, though hopefully not) is bound to change.

Yet another reason why it is better to focus on the trend rather than an absolute number for conversion rates (see #2 above) — your conversion rates are bound to get worse when you pour on the gas with advertising, especially if your previous efforts were more organic such as blog posts and customer referrals. Conversion rates, bounce rates, pages/visitor all get worse when you start bringing in lots more people, since by definition you will need to widen the net.

So this means you need to keep careful track of both data on individual leads, as well as overall trends in traffic and conversion. Having all the top of the funnel data there in Salesforce alongside your lead tracking will help you do that.

6. Your Boss Wants Pretty Reports

Finally, there is showing the boss what you are up to (also known as proving that your efforts are paying off, justifying your job, etc.). If your web site traffic and lead volume are spectacularly up and to the right, having all that data in Salesforce makes it easy to schedule a weekly or monthly email of the dashboard to people in your organization.

Or if an executive simply wants to see your web site traffic, it isn’t possible to have a nicely formatted email with graphs generated by Google Analytics, but if you have all the data in Salesforce that last step is pretty straightforward. Instead of a zipped CSV file from Google, or an Excel spreadsheet that you have to update by hand, they can receive a dashboard emailed from Salesforce, complete with all the graphs and charts, right in their inbox.


How to get a detailed Email about every new lead in Salesforce

Many online marketers and demand generation professionals want to track their leads in Salesforce, and understand the performance and ROI of their efforts in as near real-time as possible. This post is a step by step tutorial on how to receive a detailed email with all of the lead contact information and tracking details, each time a lead is created in Salesforce via the Salesforce web-to-lead forms on your website.

Your Salesforce administrator (or marketing / sales manager with the appropriate permissions) can assign new leads manually. But if you use assignment rules to automatically assign Salesforce leads to a user or queue, you can specify an email template for the notification in the matching entry. This allows you to receive an immediate, custom email with any information you want, every time a lead from your web site is created in Salesforce.

Step 1: Turn off the Notify checkbox in Setup > Lead > Settings

You may have done this already, as it can be annoying if you get a high volume of inquiries and get the standard notification email (above), which provides very little information.

Step 2: Create a Queue

If you don’t already have a Queue set up in Salesforce, I like to create one called “Inbound Web Leads” where everyone or selected people in marketing and sales can be members of the queue so they receive the notification emails.

Queues in Salesforce help teams manage leads, cases and more because records are placed in a queue, instead of being owned by a particular user. And the records remain there until they are assigned to a user or Accepted by a queue member. Any member of that queue or users above them in the role hierarchy can claim ownership of records in a queue.

You don’t technically need to create a queue, you can just assign all the leads to a single user with the same assignment rules we will use below. But a queue will give you far more flexibility now and allow you to easily scale for future growth as well.

  1. Setup > Manage Users > Queues
  2. Enter a Name for the Queue, Select the Object you want for the Queue (Lead)
  3. Leave “Queue Email” blank unless you have a single person or email list you want notified
  4. Add users as Members of the Queue

Step 3: Create an Email notification template

There is a standard email template called “Leads: New assignment notification (SAMPLE)” that comes with Salesforce and is usually stored in the “Unfiled Public Email Templates” folder. For CloudAmp’s Campaign Tracker application, designed to track lead sources into Salesforce, we created a custom email template and included it in our app

  1. Setup > Email > My Templates
  2. Select the correct folder and template
  3. Customize the template, or create your own


This custom email template, located in the “CloudAmp Email Templates” folder, has a large number of merge fields (the field names in { } brackets) which pull in contact data and all of the Campaign Tracker data into the email notification automatically. This way you can see right away when a new lead comes in how complete their contact information and tracking data is, without having to log into Salesforce.

You can of course clone and edit, or just edit this provided email template to reduce the number of fields in the email notification, or add in other fields from your Salesforce implementation that you think are important (custom fields or otherwise). In addition, if you are not using our Campaign Tracker application (why not?), you can create your own Email template and follow the rest of the instructions in the post.

Step 4: Create assignment rules

Assignment rules automatically assign new web-generated leads that meet certain criteria. Without any lead assignment rules, Salesforce assigns all new web-generated leads to the Default Lead Owner defined on the Lead Settings page.

When you create or edit a lead manually, you can also check a box to assign the lead automatically using your active lead assignment rule, but that is a different process that we won’t cover here.

For each rule entry in an assignment rule that is evaluated, an email is automatically sent to the new owner if the rule causes the lead to be reassigned, and you specified an email template. This is where the magic happens, since you can have the assignment rule assign a lead to a queue, and all queue members will receive the email.

  1. Setup > Customize > Leads > Lead Assignment
  2. Create a New Lead Assignment Rule (and make it active)
  3. Create one or more Rule Entries in the assignment rule.
  4. Choose the Email template from step 3
  5. Run some tests with your web-to-lead forms

In the screenshot above, we have just created a single rule entry with blank values, so it should capture any web-generated leads. However, in most cases where different types of leads would need to go to different people, you can create multiple Rule Entries and order them so leads fitting various different criteria get assigned differently (and can have different Email notification templates too).

Assignment Rules (combined with Auto-Response Rules) are a great way of managing different types of leads, even leads from completely different web sites in a single Salesforce org. Just use a hidden field in your web-to-lead forms to set a custom value and you can trigger both lead assignment and email auto-responses that are customized with great granularity. But that is a post for another time.

There are other ways of triggering emails when the owner of a lead changes (such as Workflow rules if you have Salesforce Enterprise Edition or above), but this is the most common configuration.

So there you have it. Just follow these steps in Salesforce, and you will be receiving complete and instant Email notifications any time a new web-generated lead is created in Salesforce (just like the one above).

Any questions or feedback, please leave them in the comments below and I will respond. Thanks!


Lead Tracking 101: Understanding Advertising ROI in Salesforce

Most marketers know they need to track their leads, in order to understand which advertising, blogs or social media are sending them the best ones – the leads most likely to convert to customers, to show a positive return on investment (ROI) from advertising, to drive long term revenue.

Aside from all the different technological approaches available, such as building your own tracking mechanism or using a Salesforce application that tracks leads from your web site into Salesforce CRM, the large amounts of data collected can be a somewhat confusing experience.

 This post explores some of the different tracking data available, and more importantly what it all means. It is focused around Google Analytics, Google Adwords, and Salesforce terminology, though many of these definitions will apply to any online advertising.

“Half the money I spend on advertising is wasted; the trouble is I don’t know which half.” — Attributed to John Wanamaker, 1838-1922


Google Analytics Campaign Tags

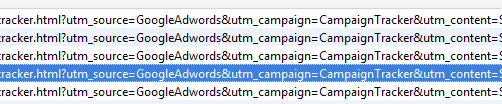
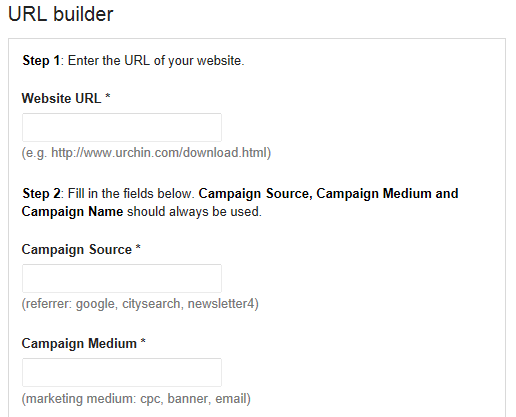
Google Analytics Campaign tags are parameters that you add to any URLs pointing to your web site that you have control over. You may be familiar with web addresses (URLs) that have words like utm_campaign= and utm_source= after the main part of the URL and a question mark – these are the campaign tags.

Example:

http://www.MYSITE.com/?utm_campaign=Retarget&utm_medium=Banners&utm_source=Adroll

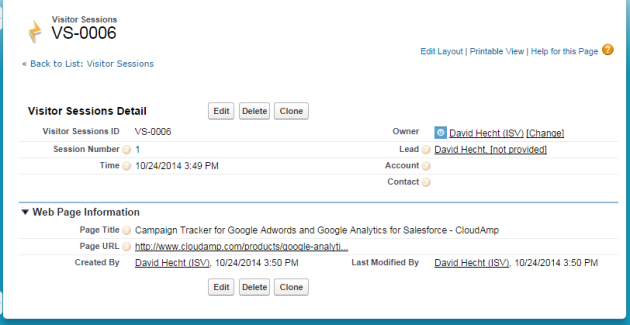
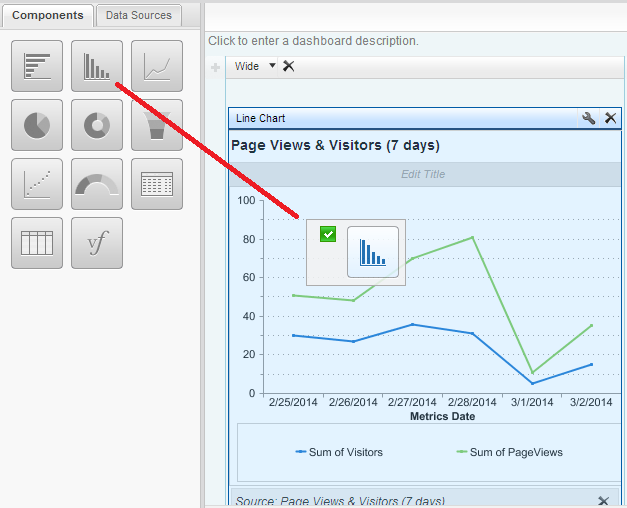
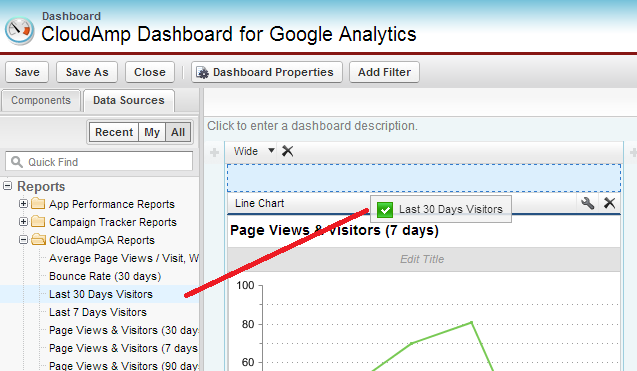
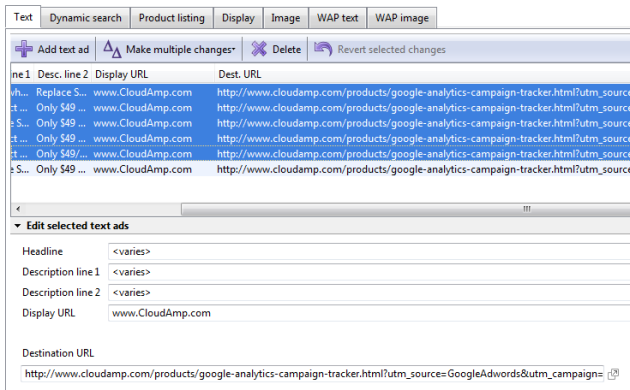
 When a visitor clicks on one of these tagged URLs, those values are associated with the visitor in Google Analytics, as well as in many lead tracking solutions for Salesforce (such as CloudAmp’s own Campaign Tracker). By capturing the Source, Medium, and Campaigns of traffic being sent your web site like in the example URL above, you can identify the most effective ways to driving more visitors to your website.

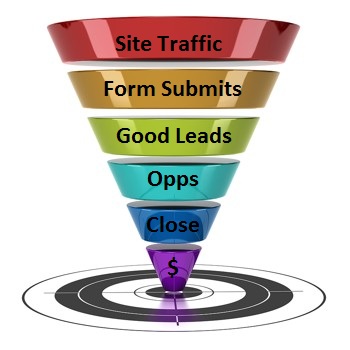
Most importantly, by capturing that data not just in your Google Analytics reports, but into Salesforce for each individual lead, you can follow how leads progress through your marketing funnel or sales process.

  • Do leads from that Source, Medium, or Campaign convert from leads into Accounts with Opportunities?

  • What percentage of Opportunities from a particular Source are Closed Won?

  • What is the average and total dollar value of deals, compared across Source, Medium or Campaigns?

  • How many dollars are spent on advertising per dollar of revenue, broken down by Source, Keyword, etc.?

These and many other questions can be answered by tagging your URLs and tracking those visitors all the way  into Salesforce as leads. 

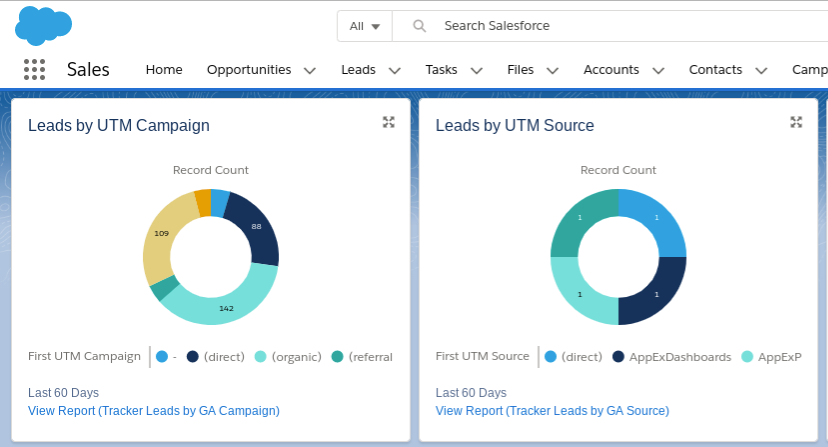
There are the five parameters that make up Google Analytics Campaign tags – utm_source,utm_medium, and utm_campaign should be used in all links, and for tracking additional information utm_term and utm_content can be optionally used.

  • utm_source: Identifies the advertiser, site, publication, etc. that is sending traffic to your property, e.g. google, yelp, newsletter4, billboard. The last place visited before reaching your site.

  • utm_medium: The advertising or marketing medium, e.g.: cpc, banner, email newsletter. The method used to arrive at the source.

  • utm_campaign: The individual campaign name, slogan, promo code, etc. for a product.

  • utm_term: Identify paid search keywords. If you’re manually tagging paid keyword campaigns (and you should be), use utm_term to specify the keyword.

  • utm_content: Used to differentiate similar content, or links within the same ad. For example, if you have two different text ads, you can use utm_content and set different values for each so you can tell which version is more effective.

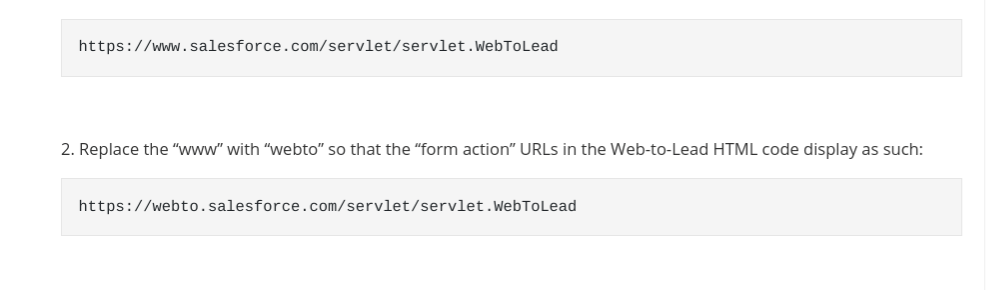
I recommend getting into the habit of tagging ANY and ALL URLs that you control, not just for destination URLs in your Google Adwords ads and other online advertising, but for every link in your email newsletters, links you give to a partner, sponsorships, blog posts, even social media such as Twitter and Linkedin.

Not only will this give you better data in Google Analytics and your Salesforce lead tracking, but as a significant bonus you will cut down on the number of untracked leads — when someone forwards an email, copies and pastes a link from Twitter, or reposts a blog post without changing the URLs, you will be able to track visitors from those newly generated referral sources back to the original campaign links.
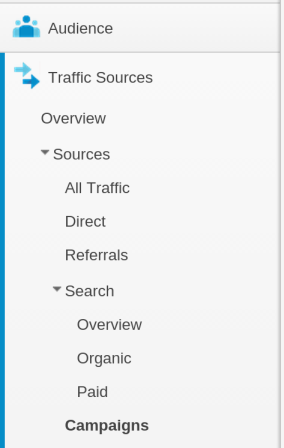
Other Traffic Types

Google Analytics categorizes your web site visitors into 5 main types:

    • Campaign: Visitors who arrived at your site via Campaign tagged URLs.

    • Referral: Visitors who arrived at your site from other sites but who were not campaign tagged.

    • Direct: Visitors who arrived at your site by typing in your web address.

    • Search: Visitors who arrived at your site by searching in a search engine. This category is further broken down into:

  • Paid: Google Adwords, Microsoft Adcenter, or other advertising on a search engine

  • Organic: The visitor clicked on a regular result (not an ad) to get to your site

Many lead tracking software applications (including CloudAmp’s own Campaign Tracker) have followed this categorization, due to the widespread use of Google Analytics and the general familiarity of these terms. Still, there are a variety of different ways of categorizing web site visitors and leads, so you may see variations on these occasionally.

Referral vs Referral vs Referrer

Any traffic that isn’t Direct to your site (typed in a browser bar) is known as referral traffic. So most traffic – Campaign, Referral, and Organic / Paid Search – is considered Referral traffic.

However, Google Analytics (and lead tracking software that uses similar definitions) defines Referral traffic as any Referral traffic that is not otherwise tracked as Campaign or Organic traffic. If Campaign tags are used, or data from an organic search at a search engine is received, the traffic will be categorized as Campaign or Organic, rather than referral. This is mainly just for clarity in dividing the sources of traffic, so that there is no overlap in the numbers.

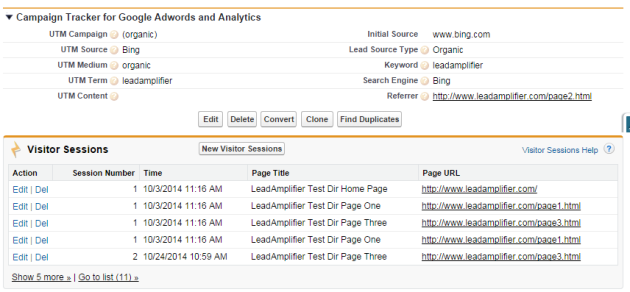
Just in case this isn’t confusing enough, there is also a concept of the Referrer in all web browsers, and this is recorded in Google Analytics and various tracking software. The Referrer is the last page that the visitor was on prior to an event (like submitting the web-to-lead form into Salesforce). So in some cases the Referrer will be the same as the site that sent the visitor to you, but in other cases it will simply be the previous page on your web site (for any visitor who clicks around multiple pages before submitting the form).
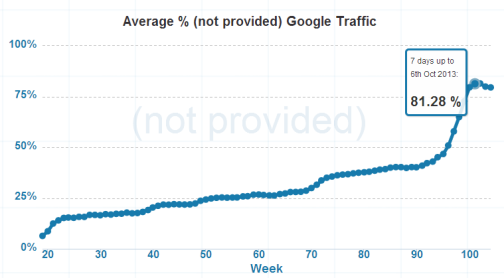
(not provided)

Beginning in late 2011, Google made a significant change and started encrypting the organic search keywords of any users who were logged into a Google service while searching Google. What does this mean?

It means that instead of sending the keywords from the referral like it did previously, Google started sending a meaningless string of characters for all visitors who were logged into a service like Gmail, Google +, or Google itself while searching and then clicking on an organic result. So what did this result in?

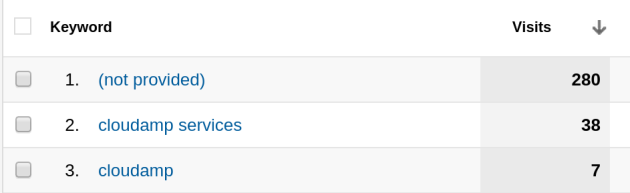
Approximately 70% of Organic visitors from Google now show “(not provided)” as the keywords from their search, so you no longer can see what really sent them to your site. This percentage will vary depending on your audience and how much they use other Google services, but it is about the average we have been seeing.

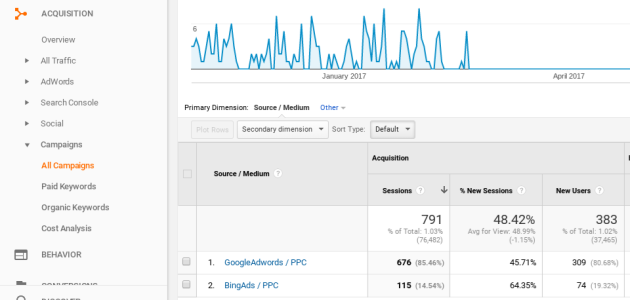
Luckily, Yahoo and Bing have not followed suit, and still send the keyword information from the Organic search visitors they send to your site. And of course, if any of your visitors run a Paid Search on Google (Google Adwords), the keywords from those visits still come through fine whether the visitor was logged in to Google services or not.

Untracked

Sometimes visitors come to your web site and submit lead forms and are not tracked properly. It shouldn’t happen often, but it will happen.

On the Internet, nothing is 100%, the numbers never match exactly, and not everything will be tracked completely. While we’d like to track 100% of visitors in an ideal world, really the point of tracking is to make generalized decisions about what online marketing works and what does not, and optimize spend on things like Google Adwords, where sometimes keyword cost per click (CPC) rates can seem nonsensically high, but make perfect sense from an ROI perspective given the revenue generated.

 So what causes a lead to not be tracked? Some users may be using strange old web browsers, or have their browser security levels set so high that they don’t allow cookies or javascript (two things necessary to most tracking technology, as well as required for most web sites to work properly).

For most other situations however, the reliability of cookie-based tracking is pretty good. If there are technical problems, they are more likely due to either the visitors settings or a failure of the tracking mechanisms that read the cookie, rather than the cookie placed at the time of the visitors click.

In conclusion, there is a lot of terminology around tracking and how to break down the types of visitors who come to your site (and hopefully become leads). As you start to build up data from tracked leads inside Salesforce, you will run across many of the values above. So hopefully this has been helpful — feel free to leave questions / comments below, and above all else, start tracking your leads today!

Tracking Google Adwords Results in Salesforce

This post explores a simple way to see Google Adwords results inside of Salesforce, using Google Analytics Campaign tags. To set up custom campaigns, just add parameters (for example, utm_campaign and utm_source) to the end of your advertising URLs. Custom campaign values display in your Google Analytics reports, and you can capture them into leads in Salesforce using a tool like the Campaign Tracker for Google Adwords and Analytics.

You will be able to see which URLs visitors click to arrive at your web site and then become a lead, and which Adwords Keywords they searched for. As a bonus, if you get into the habit of tagging all incoming URLs to your web site, you will have better visibility not just into your advertising, but into any content or links you put out there — blogs, social media, sponsorships and more. Everything except Organic search engine traffic and some referral traffic can (and should) be tagged.

Adding Campaign Tags to Your Adwords Ads

  1. You can keep Google Ads Autotagging enabled – the Google Click ID (Gclid) will be captured.

2. Update the Destination URLs in all your Adwords ads with the campaign URL parameters.

  1. If you have a lot of ads, you can use the Adwords Editor client program to easily update / duplicate many ads at once. Adwords Editor makes it easy to copy / move items between Adgroups and Campaigns, and make bulk changes very quickly.

  2. Note that whenever you make changes to your ad text or URL, they are sent back to Google for review. Rather than modify an existing ad, you may wish to create a new one so that the existing ad keeps running while your new ad is under review. Once the new ad is approved, you can delete the old ad if you want.

  3. Redirects can also cause issues with Campaign tracking and Google Adwords attribution, so Google recommends updating the actual Destination URLs in your ads, instead of using a redirect.

For most Google Ads, you can set the tracking template at the Campaign level, using the Campaign URL options.

Example URL:

http://www.YOURSITE.com?utm_source=GoogleAdwords&utm_medium=PPC&utm_campaign=CampaignTracker&utm_term={Keyword}

  • utm_campaign = Adwords Campaign Name

  • utm_source = GoogleAdwords

  • utm_medium = PPC or SEM (keep consistent with whatever categories you have defined)

  • utm_term = {keyword}

  • utm_content = optional parameter, commonly used for adgroup tracking

For tracking specific keywords, use Google’s keyword insertion format in the Destination URLs of your Google Adwords ads. utm_term is the Google Analytics campaign parameter for the keyword, so use utm_term={keyword} and Google will automatically insert the keyword that triggers your ad into the URL, so it will be tracked when a visitor clicks through to your site and submits a form.

Note: This same URL format and {keyword} insertion works in Microsoft AdCenter as well.

Google provides a URL builder tool which you can use if you would like, but you can also simply copy and modify the URL above. There is no need to create the campaigns in Google Analytics ahead of time — when a visitor arrives on your site from a Campaign tagged URL, the campaign data is automatically recorded.

Once you have tagged all your Google Adwords URLs, then you simply need a way of integrating the tracking data into Salesforce. I am partial to the Salesforce app we built here at CloudAmp, of course,  Campaign Tracker for Google Adwords and Analytics. But there are plenty of other solutions to get Adwords data into Salesforce, including marketing automation software like Marketo  or Hubspot.

If you are not using web-to-lead forms, but have an account signup process or eCommerce system, then you may want to have your developers capture the campaign tags from referral URLs directly into Salesforce via custom code. One thing you cannot use, sadly, is the popular Salesforce for Google Adwords, which is being end-of-lifed (shut down, in software-speak) on May 1, 2013.

However you decide to go, tagging all your incoming URLs with Google Analytics Campaign parameters will allow you to track Google Adwords results, as well as the success of other advertising and marketing efforts, directly inside of Salesforce.

6 Challenges with Tracking Adwords Conversions in Salesforce

With the impending “end-of-life” of Salesforce for Google Adwords, I thought I’d dive a bit deeper into some of the challenges for tracking Google Adwords lead sources into Salesforce. Regardless of whether you choose a tool from the AppExchange or build your own integration, here are some of the considerations that are not always front and center.  

Getting Enough Data

Many companies are running thousands or tens of thousands of keywords in Google Adwords, but only receive tens or hundreds of leads a week. If you don’t have a high lead volume, and a portion of your leads are from sources other than Adwords, it can be a challenge to build up enough data for the results to be meaningful.

For example, your company may find that it has a few keywords with multiple leads, but that the “long tail” exists in your tracking as well — large numbers of keywords with one or two leads. In these environments, it is very common for it to take months to build up enough tracking data for it to be actionable. You will eventually have plenty data, but don’t expect this to come within a month or two, so best to set everyone’s expectations up front.

The best time to start tracking your lead sources was 6 months ago. The second best time is today, so don’t put it off any longer — get lead tracking for Adwords set up today.

Eliminating Waste vs. Optimizing Performing Keywords

Related to the challenge of collecting enough data is what kind of actions you are able to take and when. The reality is often a bit more complicated than the idealized promise of being able to optimize all of your Google Adwords advertising, where every keyword and bid is delivering the perfect balance of revenue without overbidding or waste.

As you are collecting data, you may find that you have a number of keywords with one or two leads attached to them. Are these valuable keywords, or just clicks that became leads by chance? Only time and more data collection will tell, as leads go through the conversion to opportunity and close process so you can relate those click costs to revenue as well.

In the early stages of your Adwords tracking in Salesforce, focus on eliminating waste. The low hanging fruit you can easily take action on without months of data should be keywords that produce tons of clicks with no leads, as well as keywords that produce lots of leads that never convert. This is the waste that is poorly aligned with your products or services, and is the first area where you can confidently make changes based on preliminary data.

Eliminating waste will improve the efficiency of your overall Adwords spend and lower your cost per lead. As you continue to collect tracking data, you can then start to optimize bids, broaden your keywords, or make other optimizations based on more complete data.

Focusing on Wrong Metrics

For me being able to understand revenue / keyword inside Salesforce, instead of relying on CPC or CTR metrics, to be the primary goal of tracking Google Adwords results into Salesforce. Of course, understanding the trends across all of your metrics, CTR and CPC included, is important. But all metrics are not created equal.

How critical revenue / keyword tracking is will vary depending on your business of course. If you only sell one product at a single price, it may not be as important — the sale amount and lifetime value of most customers is the same, so you are mainly optimizing the demand volume side of the equation. But if you have multiple pricepoints that vary significantly, a more expensive click that typically drives a large purchase can be far better than a more affordable click with an average revenue that is lower.

This importance is only multiplied if you are bidding on very competitive keywords. Bidding $25 or even $50 for a single click always seems painful, unless you can track those same clicks through to significant large purchases on a consistent basis. What seems crazy without tracking can be shown to make financial sense and drive significant revenue when properly tracked.


Picking a Source of All Truth

Where do you store your Adwords tracking data? Do you use Salesforce, Google Analytics, or both? What about duplicate / conflicting data?

I am partial to making Salesforce the single source of truth, but of course I build Salesforce applications to centralize data there. Google provides some great tools, especially considering many of them are free / advertising supported, but those systems are not designed to be a long term database, nor are they as customizable as Salesforce is.

One advantage to centralizing Adwords tracking data in Salesforce is that the data can be (potentially) useful to others outside of the marketing department. Sales reps might be interested in what keywords a lead was searching for, to better understand their intent. Or if you don’t want to expose that data to the sales team, you could still use it to drive lead scoring formulas that determine how views are sorted or which leads are visible to the sales team.

A corollary to the “single source of truth” is that to keep yourself sane, you should accept that if you use multiple systems, the numbers in different online tracking systems will never agree exactly. Even the numbers between Google’s different systems don’t match. As with other marketing metrics, it is the trend and the consistency that is more important — as long as the numbers are close enough, focus on any divergence or suddenly larger gap between different analytics systems, as that could indicate a problem.

Poor Lead Hygiene / Salesforce Processes

Another common challenge to tracking Google Adwords (and other online advertising) conversion in Salesforce is poor data quality and a lack of consistently followed processes for handling data. Duplicate leads, no consistency across the sales organization for when leads are converted to opportunities, and custom fields that don’t map anywhere upon conversion are all common issues we see with Salesforce usage that affect campaign tracking.

With so many systems integrated into Salesforce, and marketing automation systems increasingly inserting their own databases into the middle of things, we also see lead sources that get lost or overwritten, and a lack of proper reports / dashboards to give a holistic picture of the data.

If you are embarking on a project to track your Google Adwords or other online marketing leads in Salesforce, try to make data cleanup and process improvements part of the job. You’ll end up with better data and a higher likelihood that you are making decisions based on accurate data as a bonus.

Not Having Correct Tools

Finally, we come to the tools you use to get your Google Adwords data into Salesforce. Some companies have their web developers or engineers build a system to push this data into Salesforce. And if you have an eCommerce system or Account signup (instead of a lead process), custom building a solution may be your only real option unfortunately. But many of us don’t have development resources at our disposal, or the engineering team is too busy on customer-facing product development to work on internal marketing tools.

For those using standard Salesforce web-to-lead forms and processes, there is a new generation of tools available like our (CloudAmp’s) Campaign Tracker. Installable directly from Salesforce.com’s AppExchange, these tools can add in additional information like where a lead came from, what keywords they searched for, and more.

Google-Analytics-Campaign-Tracker-Header

Most importantly, this information becomes a permanent part of the lead record in Salesforce upon the form submit, so you can track those values throughout the lead lifecycle and see conversion and revenue data. Now you can get real ROI data on Google Adwords and your other marketing and advertising efforts, and know in detail which keywords or placements produce your best leads.

Despite the challenges, now is the time. So don’t wait any longer, start tracking your Google Adwords and other advertising lead sources into Salesforce today. Eliminate waste wherever possible, and reallocate funds to the top performing advertising, and your revenue and cost of sales can improve significantly.


Replacing Salesforce for Google Adwords

Salesforce for Google Adwords launched back in 2007, and for the first time made it easy to associate Adwords advertising data with individual leads inside Salesforce. I was one of the first enthusiastic users and a customer case study for Salesforce on their roadshow announcing the new application.

Finally, we could permanently tie Adwords clicks to an individual lead, and track conversion all the way through from lead to account to closed opportunity. No more focus on Google Adwords CTR, CPC or other important but sometimes misleading metrics. We had arrived at the promised land: $ spent / $ revenue generated on a keyword basis. And we could now get this data even if the lead closed 6 months after the Adwords click and came in via Fax.

Some time ago Salesforce.com announced that the Salesforce for Google Adwords app could no longer be installed, and that support for existing users would be ending May 1, 2013. I don’t know all the details behind this decision, but this blog post is focused on what you can do to replace Salesforce for Google Adwords, and one alternative application that we have developed here at CloudAmp.

CloudAmp’s Campaign Tracker, launched in October 2012, is a viable alternative to Salesforce for Google Analytics. Just install the app into Salesforce, add a tracking code to the pages of your web site and insert some additional code in your web-to-lead forms, and you can start capturing data every time a new lead comes into Salesforce.

Campaign Tracker is designed to be simple, to minimize the number of things that can go wrong in the tracking process. There is no external database to sync to Salesforce, so leads go directly into your Salesforce org via web-to-lead forms, and your data never leaves your Salesforce org. We give you the tracking cookie javascript to host on your own web site, so there no third-party cookies that are often blocked.

Google-Analytics-Campaign-Tracker-Header

In addition, Campaign Tracker does not actually pull any data from Google Adwords or Google Analytics, so we don’t rely on data from those services or the availability of APIs. We simply make use of the Google Analytics Campaign URL format, and save the UTM values from the URL into a cookie that your web site sets.

When a visitor to your web site submits a Salesforce web-to-lead form, we parse the cookie and populate some hidden fields in the form with the campaign values. As a bonus, you have more complete campaign data in Google Analytics, since you should be tagging all of the inbound URLs that you can control.

After you have the tracking enabled on your web site, simply update your Google Adwords URLs in a format like that below, filling in your own values for the campaign etc., and you are ready to go. To make things easier, if you have a lot of ads to update, the Google Adwords editor (a desktop program for your PC or Mac) makes it easy to update many ads quickly.

http://www.YOURSITE.com?utm_source=GoogleAdwords&utm_campaign=CampaignTracker&utm_medium=PPC&utm_term={KeyWord}

The {KeyWord} at the end of the URL uses Google Adword’s keyword insertion to automatically insert the keyword into your URL, just the same way it can insert a keyword into the text of your ad. You can also use the 5th campaign parameter, utm_content, to record the Adgroups if you would like.

That’s it! So if you are looking for an easy to implement alternative to Salesforce for Google Adwords, check out CloudAmp’s Campaign Tracker — it installs directly from the AppExchange for a free trial. If you have any questions, leave a comment below, or contact us and we’ll be glad to help.


Great Marketing Slogan

I see this truck parked in front of a produce store at 23rd st and Mission a few times a week, and it makes me laugh every time I see it. “Superior Quality, Service & Price, Without Sacrificing Honesty.” What a great, everything and the kitchen sink marketing slogan.

Whoever wrote this slogan sure doesn’t subscribe to the “less is more” school of marketing.

If you have “superior quality, service and price” do you really need honesty? 😉


The Emailed Dashboards School of Management

Today we have access to increasing amounts of data and analytics, from all kinds of systems and applications that were not easily accessible to business users even 5 or 10 years ago.

“Big Data” it is sometimes called, though more because it sounds cool than the actual size of the data in many cases. With all of this data however, understanding the “meaning” of the data is increasingly difficult.

We all need a way to quickly spot trends, and gain actionable insights from all that data that helps us manage the people and processes in our daily work.

One method I have found to be particularly effective in making use of data is having a series of dashboards automatically updated and then emailed to me nightly or weekly. Hourly between midnight and 4 or 5 AM, Salesforce updates my dashboards and emails them to me, graphs and all, to be reviewed while having my morning coffee and cleaning out the inbox.

Getting dashboards emailed to me eliminates the need to remember to log in and check the correct reports, and makes it easy to spot any anomalies or trends early. If I need more information about a graph or chart, clicking on it in my inbox takes me directly to the underlying report in Salesforce.

And having all the data centralized in Salesforce (hopefully) makes it easy for the data to be up-to-date without any human intervention to combine data sources or update spreadsheets.

Some Dashboards I like to see daily:


Website traffic via Google Analytics into Salesforce – how many unique visitors, page views, etc. did I get yesterday and where did they come from? How did that big blog post do? Anything that doesn’t look right? (Yes, I know I can log into Google Analytics and see this high level data plus a whole lot more, but I probably won’t — unless an email dashboard alerts me to something that warrants deeper investigation.)

Registrations via backend database integration – if visitors are signing up on a web site or registering for an account with a SaaS product, I want to push that to Salesforce (within a few minutes ideally), so I can correlate visitors with registrations and have a clear view of the top of my funnel.

Leads via Salesforce’s Web-to-Lead form and other sources – how many inquiries are we receiving, and what is happening to them. This should include lead sources, ideally set by an automated tracking system (and yes I have one that I favor), as well as anything sales reps or marketing people enter into Salesforce clearly identified as such for separation in reporting.

Sales activity via Salesforce – How many calls, emails and other activities are happening, and which reps are performing best. Don’t think of this as big brother or keeping the Sales people honest, but more as understanding your business’ sales productivity. And if you haven’t worked in sales before, you have to witness the data to understand that one Sales rep really can make 5 times more calls than another rep (and generally close 5 times as much business, though not always) even though both reps appear productive anecdotally.

Online Advertising Performance – If you are advertising online, Leads or Registrations with daily graphs broken out by advertising publisher is a particularly useful dashboard. You do need to keep some of those ad networks or blogs honest in terms of the impressions they are running and traffic they are sending you. Plus you will be able to see right away if your conversion tracking code was accidentally left off that new landing page, rather than at the end of the month when the numbers are run and it is too late.


Some Dashboards I like to see weekly:


Usage data – Integrating usage data from SaaS products or other customer behavior or purchasing information into Salesforce accounts is critical for both lead scoring / account ranking, as well as aggregate numbers on how the business is doing overall. I like to see a dashboard that has total usage (or whatever the key metric that shows customer adoption is) across all customers, as well as a list of top accounts, new accounts with high usage, and potential churn accounts whose usage / purchasing has recently dropped off.

Conversion funnel – what are the trends in terms of lead conversion / opportunity creation, and how does the top of the funnel look in terms of volume.

Sales Pipeline – what Salesforce Opportunities are open, if there are free trials which are expiring in the next week or two, how many deals are at each stage, and is anything neglected or staying open forever without movement?

Revenue – If you have a billing or other financial system integrated into Salesforce, it is nice to have some revenue dashboards as well. It isn’t a substitute for financial reporting (and won’t make the accountants happy), but can help you see total revenue, new sales, and understand some high level financial trends, even if it isn’t accurate to the penny.

By reviewing daily or weekly dashboards emailed from Salesforce, you can start each day with a quick overview of your business, and an easy opportunity to understand any trends and spot problem areas or successes. In addition, building these dashboards will ensure that you have all or most of the data that you need in Salesforce for other people to use, so it can make the chances of success much greater if you are just rolling out Salesforce CRM.

You may need to dive back into any one of a number of systems to see further details in the data, or use more sophisticated analytical tools to understand the correlations between different data sets. But ultimately having the data summarized, automatically updated and emailed to you in dashboards is a great way to stay on top of the top line numbers and trends in your business.

How are you using dashboards, and do you get them via Email? Let me know in the comments below.


CloudAmp’s Google Analytics Campaign Tracker launches on the AppExchange

Today we are proud to announce that CloudAmp’s first application for Salesforce, the Google Analytics Campaign Tracker, has gone live on Salesforce.com’s AppExchange.

CloudAmp’s Google Analytics Campaign Tracker lets you know exactly which campaigns and sources are producing your leads. It is designed to capture data from the familiar Google Analytics Campaign URLs  into Salesforce via Web-to-Lead forms, so you can know which leads resulted from which advertising campaigns or web site referrals.

If you tag banners, search engine campaigns, email newsletters or links on external websites with Google Analytics Campaign URLs, when visitors click on those tracked items they arrive on your web site with a referral URL that contains those parameters (utm_campaign=, utm_medium= etc.). Now with the Google Analytics Campaign Tracker, you can capture those values into Salesforce when that visitor submits a web-to-lead form, and forever know how you got that lead.

The Google Analytics Campaign Tracker also contains a dashboard and a number of reports, for a turnkey way of analyzing your data once you start collecting it.

Try CloudAmp’s  Campaign Tracker today, free for 15 days. We’ll even help you get it set up and tested.


Startup Salesforce Tip #1: The Founder Welcome Email

This is the first in an occasional series of my favorite sales and marketing tips for startups and SMBs. Enjoy! –David

One easy and effective marketing best practice is to send out a personalized welcome email about a week after customers sign up for your application or service. Ideally this should be a personal note from one of the founders, short with no sales pitch — more of a “checking in / introducing myself” email. And Salesforce makes it easy to do .

The idea is for this email to be much less formal than the typical welcome emails / autoresponders that go out right after signup, and which contain lots of information and links. It should be signed by one of the founders or an executive whenever possible (a Sales or Marketing title will decrease response, depending on the type of customer base), and should contain as much personal contact information as you feel comfortable giving out.

Example:

Hello {!Contact.FirstName}

I just wanted to follow up with you personally, and make sure you were having a good experience using [Product].

Please let me know if I can provide you with a demo, connect you with anyone on our support team, or help in any way. My contact details are below.

Best,

John Smith
Co-Founder
[email protected]
415-MY-MOBILE


This may seem silly or to be a waste of time, but there are a variety of reasons why it is worthwhile.

  • Additional Touchpoint. Some people will realize this is a form email, but it seems less automated than the system emails people get when they signup. This perception will vary quite a bit depending on your target customers, of course (technical people are very different from marketers, B2B very different than B2C). But in general it is a good excuse to reach out to customers which few will object to, and you may get more responses than you would think (it is easy for someone to dash off a quick response to a seemingly personal email).
  • Identify serious customers. Many customers will appreciate getting the personal contact information of a founder or principal, or really anyone at the company, especially in B2B products where having an actual person (or a person beyond a sales rep) could be beneficial to them as they become a serious customer. They may respond to the email, allowing you to further identify them as qualified.
  • Identify unqualified customers. Sometimes people will respond with “your product sucks” or “take me off your list.” Never discount the value of a NO, it helps you get to those who will buy that much faster. Just make sure you update their customer records as unqualified / email opt-out in Salesforce.
  • Identify misconceptions. A few customers will respond with a variation of “I like your product, but I am not going to use it because it does not do X.” When in fact your product does do X, or maybe there is a workaround, or maybe you are coming out with that feature next week. Good to know.
  • Gather additional data. Not everyone will like this one, but when people reply often additional information is available in their email signature, or their gmail address forwarded to a corporate email address that they reply from. Since so many signup processes for web apps these days are trying to be ultra-low friction, requiring just email address and password or less, I like having someone enter this information into Salesforce whenever you can.

When and How to Send

I recommend sending these emails once a week to everyone who signed up in the past week, using the Salesforce “Mass Email” feature (available in Professional Edition or above). After some initial setup, it is a fairly quick process to do it every week.

Salesforce makes it easy to send out the emails, you don’t have to pull lists into an external system, and best of all you can also remove recipients who are already corresponding with a sales rep or other person at your company (filter out based on last activity or visual inspection).

First, create an email template similar to the one above, or create your own to match the positioning and voice of your business. In Salesforce, go to

Setup > Email > My Templates > New Template

Create a new template, add any merge fields you want (I prefer first name with a Hello greeting and no punctuation, so if there is no value in the customer record it doesn’t seem awkward like “Dear”). Be sure to check the box that makes the template available for use.

Second, go to the Contacts tab and scroll down to

Tools > Mass Email

at the bottom right (Assuming you are importing all signups as Accounts, otherwise go to the Leads tab).

ou have to create custom views of recipients for a mass email, but each week you can then click “edit”, update the dates, and “Save as” to get a view for the new batch. In the example below, I am selecting accounts that were created in a single week, and then using the filter logic to also select accounts that either have no activity (no calls/emails recorded on the account), or at least that haven’t had activities in the last day (“last activity less than yesterday” in Salesforce-speak).

You should adjust those values to match your follow up and how often you want to contact customers, and you can also add in additional filter criteria (such as Account Type or custom fields that segment your customers such as Plan or product type).

Once you have saved as, you will see a list of customer emails. If you would like, you can manually scroll through them and uncheck any contacts that you don’t want to receive the email. Click next and select your email template, then next and select your settings for when to send the email. I recommend selecting “Store an activity for each message” so anyone looking at the contact later will see that they received the email. You can also choose whether to “Use My Signature” that is in the email setup, or include a custom signature as part of the template.

Click send, and wait for the response.

Then set a calendar reminder, and in one week change the date fields on the view, save as, and you’ll be ready to go all over again.

Caveat: If you are getting more than 500 customers a week, you will need to do this more frequently (Salesforce limits mass email to 500 per day). A lot more than 500 and you probably can’t use Salesforce efficiently for this, so use whatever external system you use for newsletters and other large email volume (Mailgun, SendGrid, MailChimp, ExactTarget, etc.)

But I already get too much email

I’ll leave you with a final tip I’ve seen some startups employ to deal with this, and it is a clever hack that should work for awhile. If you are worried as a founder about getting more email in an inbox already filled with critical emails from customers, partners, and investors, you can set up an alternate but plausible email address. For example, if [email protected] is your primary address, you can set up [email protected] as an alias that goes to a separate box, or even an alias that goes to you and a Sales person who is tasked with responding to customer inquiries.

Then filter email to [email protected] so it doesn’t go into your inbox, and only reply personally when you need to. You are just lending your name and credibility to the email — if you can follow up to responses personally that is great, but if not, it generally is not a big deal as long as someone responds.

Cloudamp_horizontal_100x60

CloudAmp provides Customer Analytics for SaaS companies, directly inside of Salesforce CRM. If you have a trial or free plan, we can show you who your best leads are based on their real-time usage.

Flying Blind in the Freemium Funnel

You launched your new App. Hundreds, maybe even thousands of people signed up for a trial or free plan.

Congratulations. Now what?

When you had a few beta users, you could communicate individually with them, and have a pretty good idea about how everyone was using your product. Now you are looking at a huge list of anonymous customers, and wondering where to start.

If yours is like most companies, you push your sales team (or yourself in an early-stage startup) to manually review more accounts, and do more introductory emails and phone calls.

Or marketing establishes a timeline of how customers would normally start using your product, and sends out mass emails based on their best guess of where customers should statistically be in that process, based on when they signed up.

Ok. But can’t we do better?

What if you could see exactly how each individual customer was using your app, directly within your CRM system? And what if all of their contact information, account information, and usage metrics updated in real-time?

Then you could know exactly where each customer was in the freemium funnel.

Who had signed up, who has started using the product. Which customers were using the product in a way that they were likely to stay on the free plan forever. Which customers are starting to use the product in a way that indicates they should upgrade to paid, and which ones are stopping or decreasing their usage.

Once you have that visibility, all sorts of things become possible.


You can segment customers between marketing and sales, updating your sales team’s CRM views so that customers who have just signed up or who aren’t seriously using the product don’t clutter their prospect view. Let email campaigns from marketing automation handle those guys. But if a new customer’s usage suddenly matches your best customers usage, you can now trigger a follow up task for a sales rep right away.


This actual usage data is very useful for a free trial, but critical for the freemium (or permanently free) plan, where adoption is often not as time-defined since there is no pressure to start paying. Learning the usage metrics of when customers might be likely to upgrade to paid, and then making sure your follow up efforts mirror those events will have a significant impact on conversions.
There is no punchline to this story, just a happy ending.

Of course, CloudAmp has built a product which does precisely all of the above. By integrating data from the back end of your SaaS application directly into Salesforce (other CRMs coming soon), you get the real time understanding of how each individual user is engaged with your product. And your team can segment your users based on their actual behavior at that point in time, for targeted conversations that produce revenue.

Stop flying blind in the freemium funnel, and get some visibility into your users today.


CloudAmp helps software companies centralize  customer engagement, usage and account data in their CRM.

Increase your conversion rates, customer retention, and revenue by gaining real-time visibility into how customers are using your App, directly within Salesforce.