Published April 19, 2024 by David Hecht
If you track Leads and Opportunities in Salesforce’s Sales Cloud, you can link your Google Ads account to import your conversions from Salesforce into Google Ads. This will help you better measure how your online Google Ad spend is generating offline conversions and revenue, as well as allow Google to optimize your advertising using Salesforce Opportunity data if you choose.
If you are using the CloudAmp Campaign Tracker to attribute advertising campaigns to your leads, you are already capturing the key that connects the two systems – the Google Click ID, or Gclid. In that case the setup is much quicker and easier than it would be otherwise, and you can skip to section 3, Salesforce Configuration Steps. Otherwise, read on.
| 🖙 Note:
Even if you are not using CloudAmp, these steps will help you connect Salesforce and Google Ads. Whether you use different Salesforce lead attribution software, or plan to have your web developer capture the Gclid with custom website form code, the basic steps are the same. |
In this guide, we’ll show you how to set Salesforce to import conversions into Google Ads. Topics include everything from tagging on the Google side, to your Salesforce setup, all the way to using the conversion data in Google.
Your first step in connecting Salesforce and Google ads is to make sure Google is adding the Gclid parameter to your ad URLs, a process known as “auto-tagging”. This setting may already be enabled, since it is required for connecting Google Ads to Google Analytics, as well as for Google Ads website conversion tracking. But it’s best to make sure, as without the Gclid parameters, the rest of this configuration won’t work.
When someone clicks on a link in one of your Google Ads, your website will see the Gclid, or “Google Click ID” value in the incoming URL. The Gclid is a unique, long string of letters and numbers that identifies the particular ad a visitor clicked on in Google’s system.
When that visitor submits a form on your web site, and creates a Lead in Salesforce, the CloudAmp Campaign Tracker automatically adds that Gclid to the lead record. If you use a different technology to capture UTM and other url parameters, you may be able to get the Gclid a similar way.
When a Lead is converted, and creates an Account, Contact and Opportunity, the Gclid follows along to the Contact, as well as to the Opportunity (once you have completed the setup below).
Google Ads will then periodically check Salesforce, to see if any of the Opportunities with Stages (as you configure during the setup) are associated with the unique Gclid IDs. If so, it will count those stages as conversions attributed to that particular Google Ad click.
Enabling auto-tagging in Google Ads is easy. Once you are logged in to your Google Ads account, simply do the following:

Auto-tagging is simple to enable, but there are a few situations where it may cause issues. If you have special redirects on your web site, be sure they can handle long parameters, as the gclid value can be up to 100 characters long.
In addition, some websites are not compatible with auto-tagging because they do not allow arbitrary parameters in URLs. Occasionally web servers rewrite the case of incoming URLs to all lower case letters as well, which won’t cause errors but can throw off the tracking data, since gclid values can contain both uppercase and lowercase letters. Both of these situations are pretty rare, but if you have any issues during testing, you might check with your web developer.
In the past it was not recommended to enable auto-tagging if you also had manual tags (like utm parameters) in your Google Ad urls. This was because in certain cases it could result in duplicate or conflicting tracking data, but that issue has been largely resolved.
Many customers today use both auto-tagging and manual UTM tags, since manual UTM parameters are required for systems like CloudAmp to capture data into Salesforce, as well as providing a tracking data source independent of the Google ecosystem.
Note: If you are using both manual tags and gclids via auto-tagging, on the Google Analytics side there is a setting to “Allow manual tagging (UTM values) to override auto-tagging (GCLID values).” That way your manual UTM tags can override but be supplemented the values from the gclid at the same time.
If you are using Google Analytics for conversion tracking, you may wish to have that setting disabled. That way, Google Analytics will pull its internal values from the Gclid, rather than using the manual UTM tags. The manual tags will still be available for reporting in Salesforce via CloudAmp or other systems, but there won’t be any potential for conflict (such as the default medium of cpc being overridden to a value from your manual utm_medium tag). For more details, check out Google’s documentation, since Google Analytics is a whole different topic, outside the scope of this guide to connecting Google Ads and Salesforce!
If you have developed custom code to populate UTM parameters and other source data in your Salesforce web-to-lead forms, then you should ask your web developer to begin capturing the GCLID value as well. Google provides some sample javascript code in its documentation for how to “Edit your website to collect and save the click ID.”
For most marketers, your marketing attribution software should be able to automatically capture the GCLID. Since CloudAmp publishes the Campaign Tracker software for Salesforce, which automatically captures the GCLID (as well as other advertising IDs, like Microsoft’s MSCLKID), we are going to provide instructions based on our own app.
First install the CloudAmp Campaign Tracker in Salesforce, and add the tracking script to your website footer. Setup can normally be done in minutes, depending on your ability to update your website. For a quick overview of the process, see our Quick Start Guide.
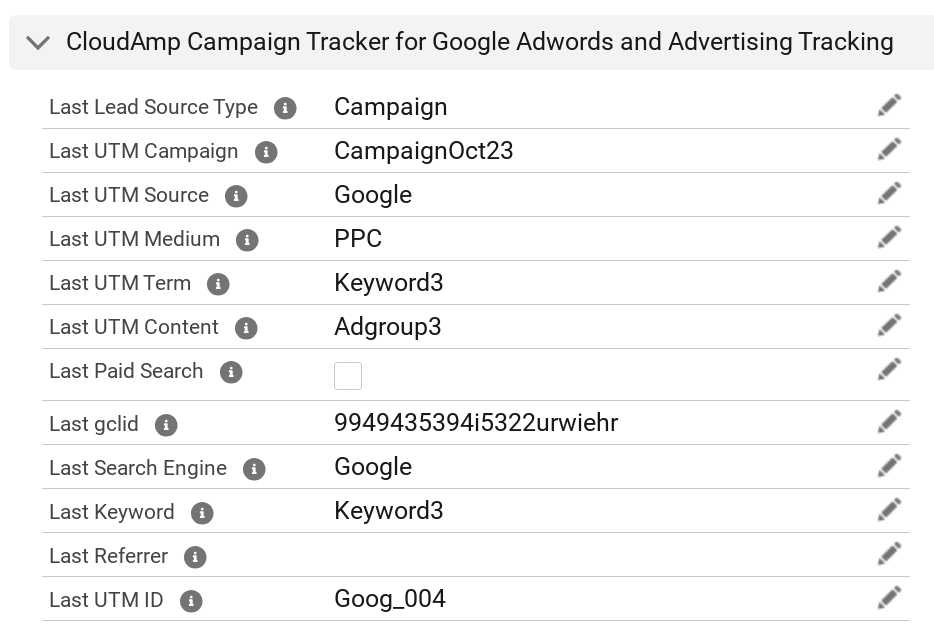
Once the Campaign Tracker is up and running, you can test to make sure the GCLID parameter is successfully showing up in Salesforce. No need to click on one of your ads, you can use our spreadsheet template download to generate test URLs, and then add a test GCLID parameter at the end of any URL in this format:
&gclid=9949435394i5322urwiehr
So a test URL format would be similar to:
https://www.yoursite.com?utm_campaign=CampaignOct23&utm_medium=PPC&utm_source=Google&utm_id=Goog_04&utm_content=Adgroup3&utm_term=Keyword3&gclid=9949435394i5322urwiehr
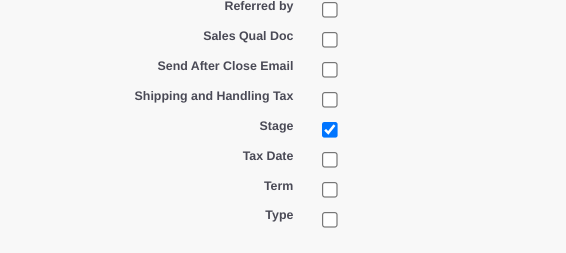
Once you have submitted a test lead or two, check Salesforce. You should see the value from your URL in either the “First gclid” or “Last gclid” field on the new lead:
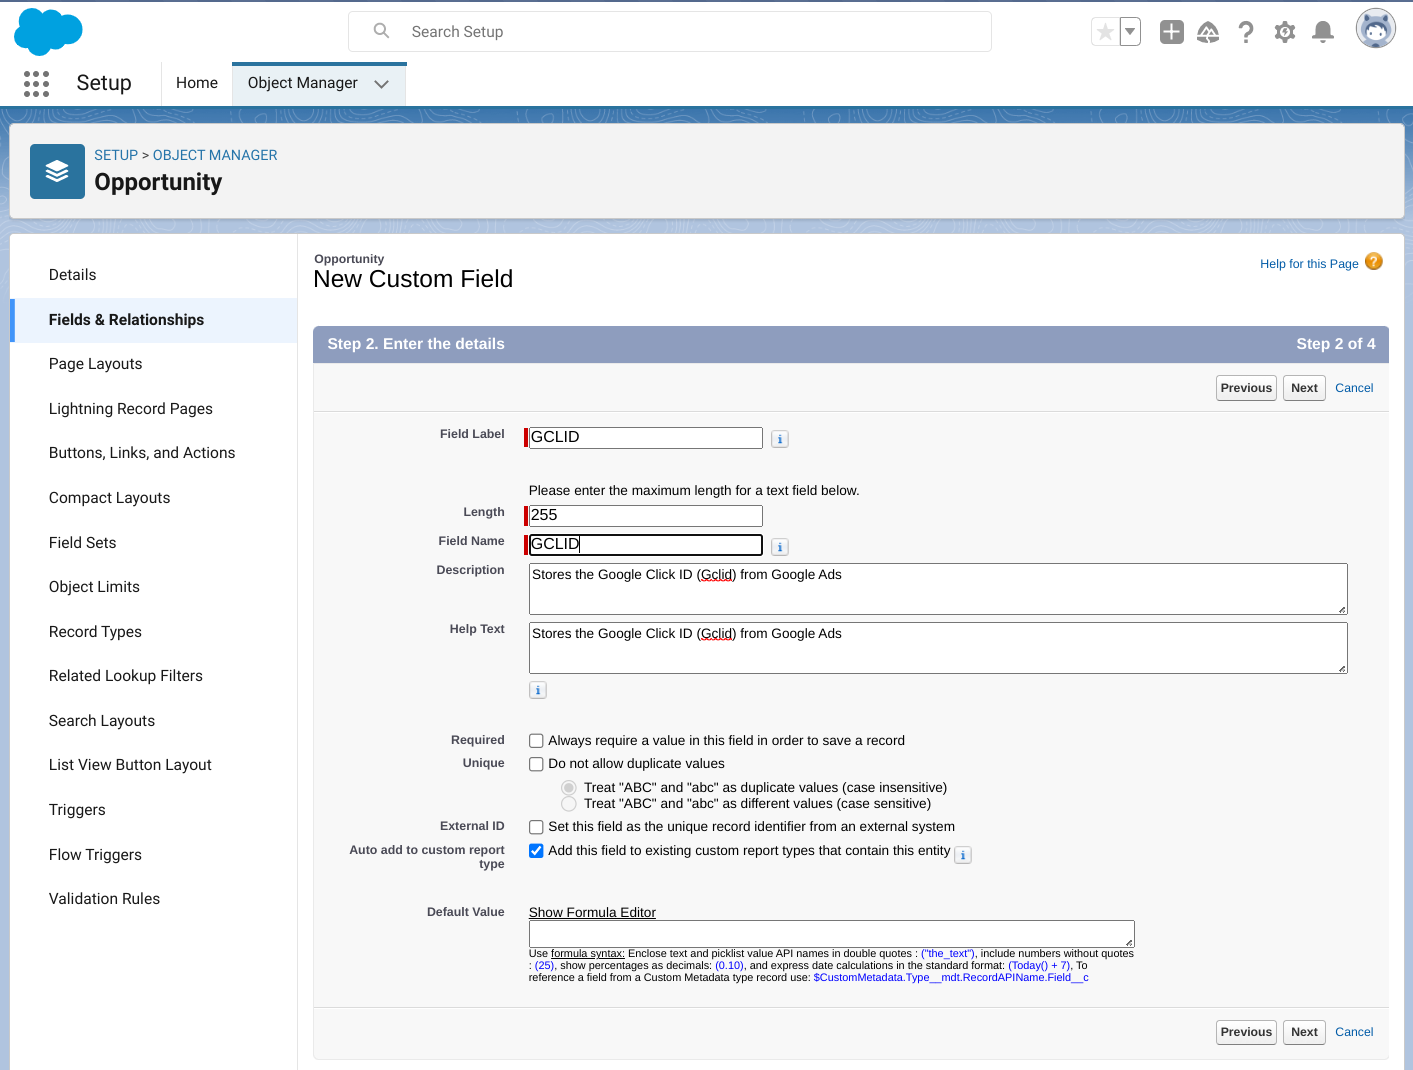
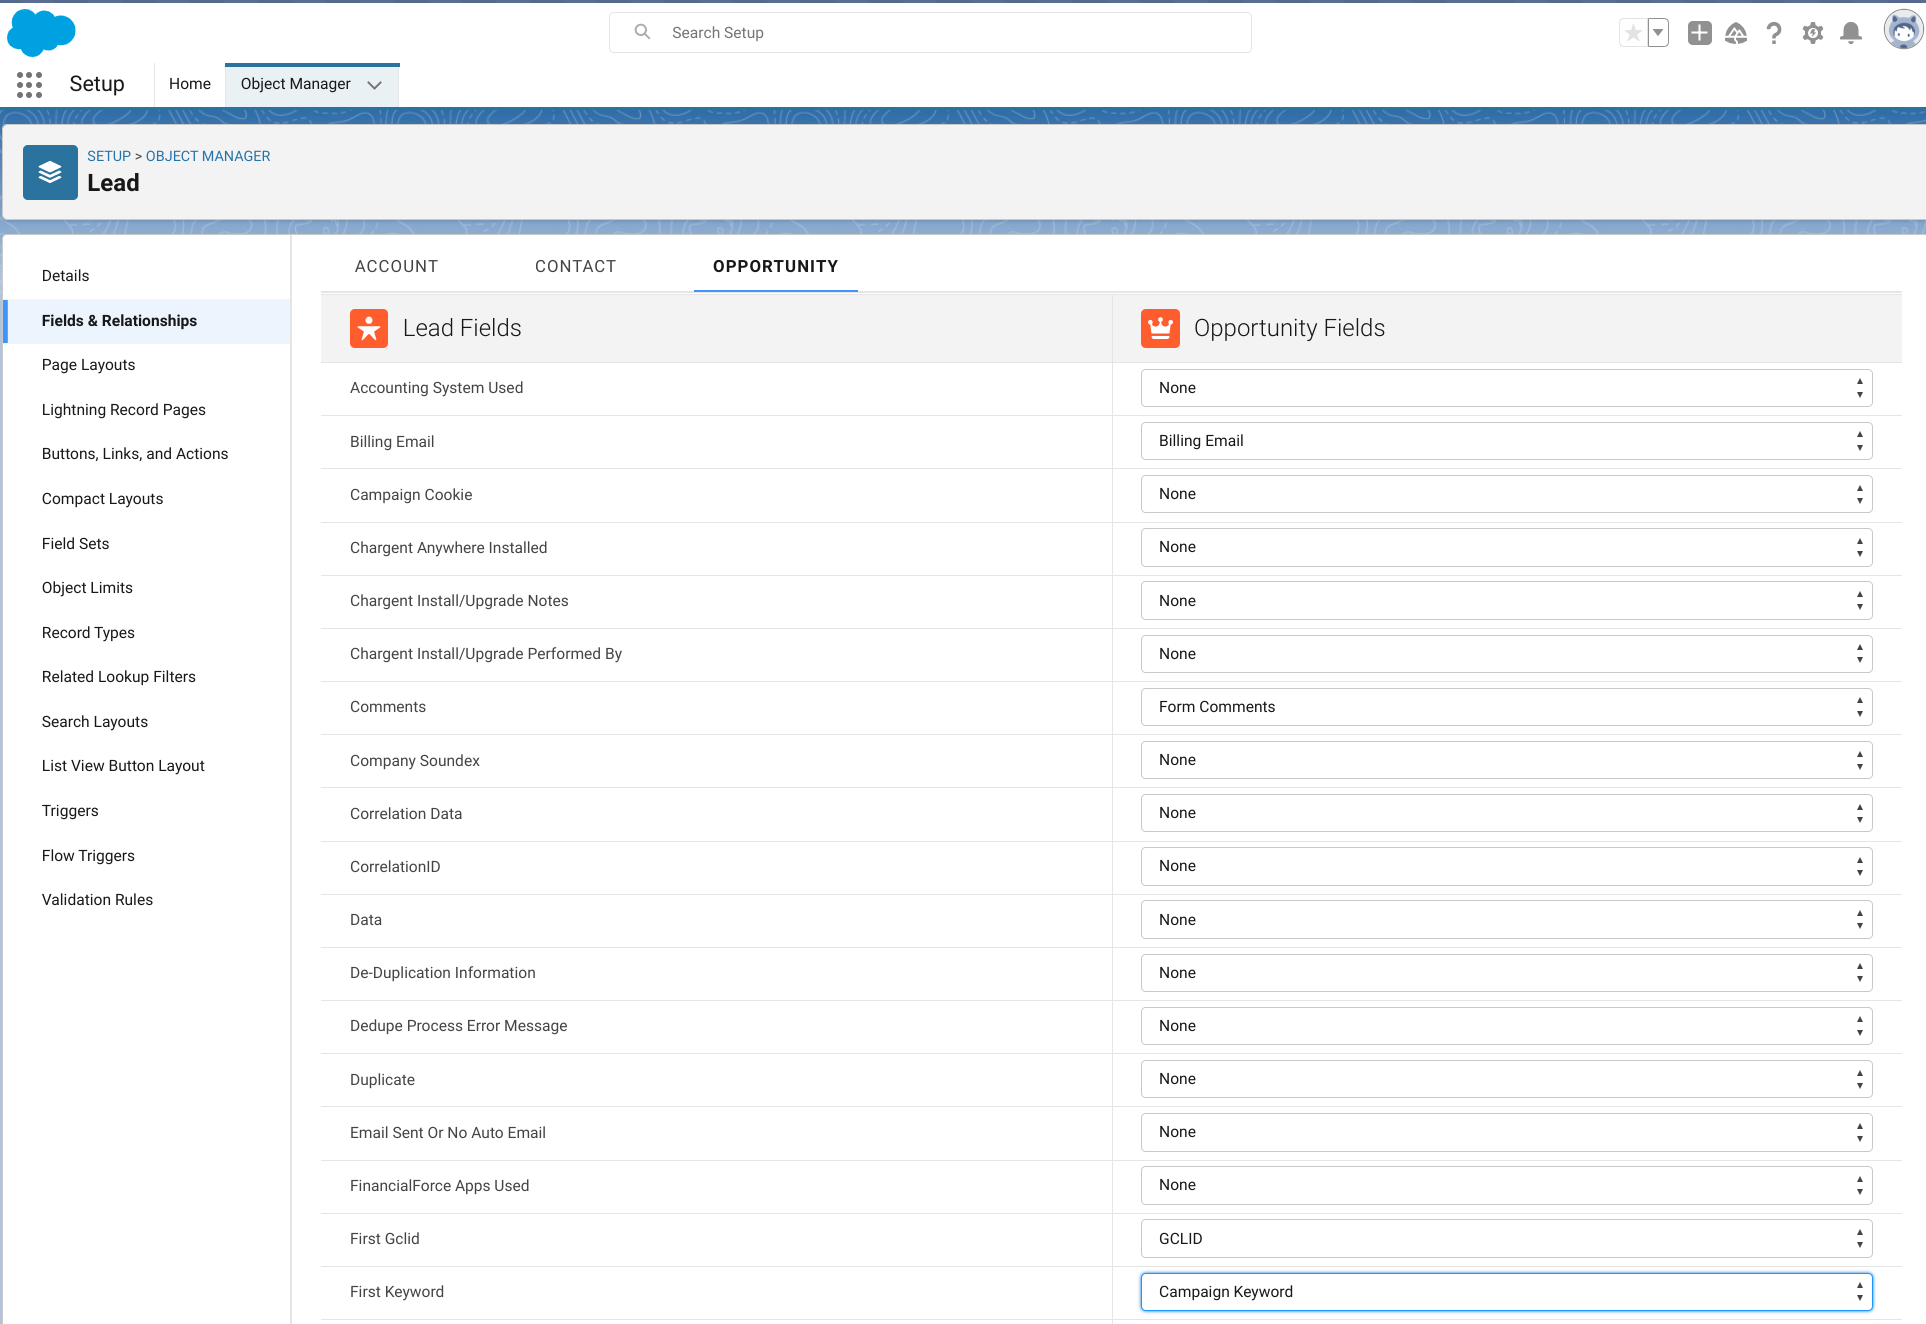
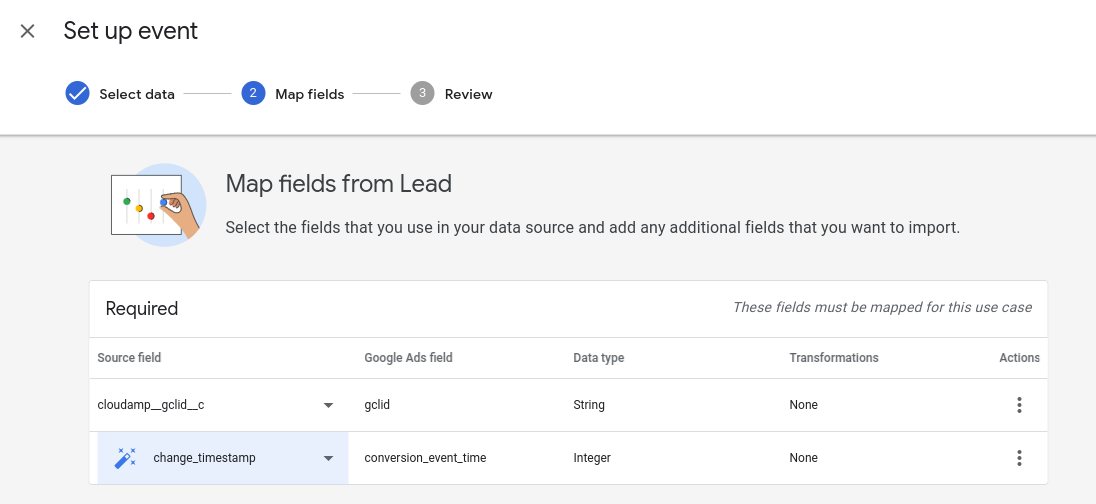
Now that you are successfully capturing the GCLID in new Salesforce leads, it is time to add the field required by Google for linking to Salesforce. Using CloudAmp, we’ll just map the CloudAmp GCLID field to the field that Google is looking for in its integration.
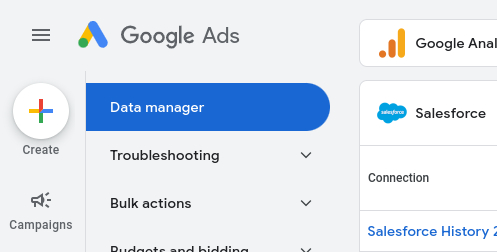
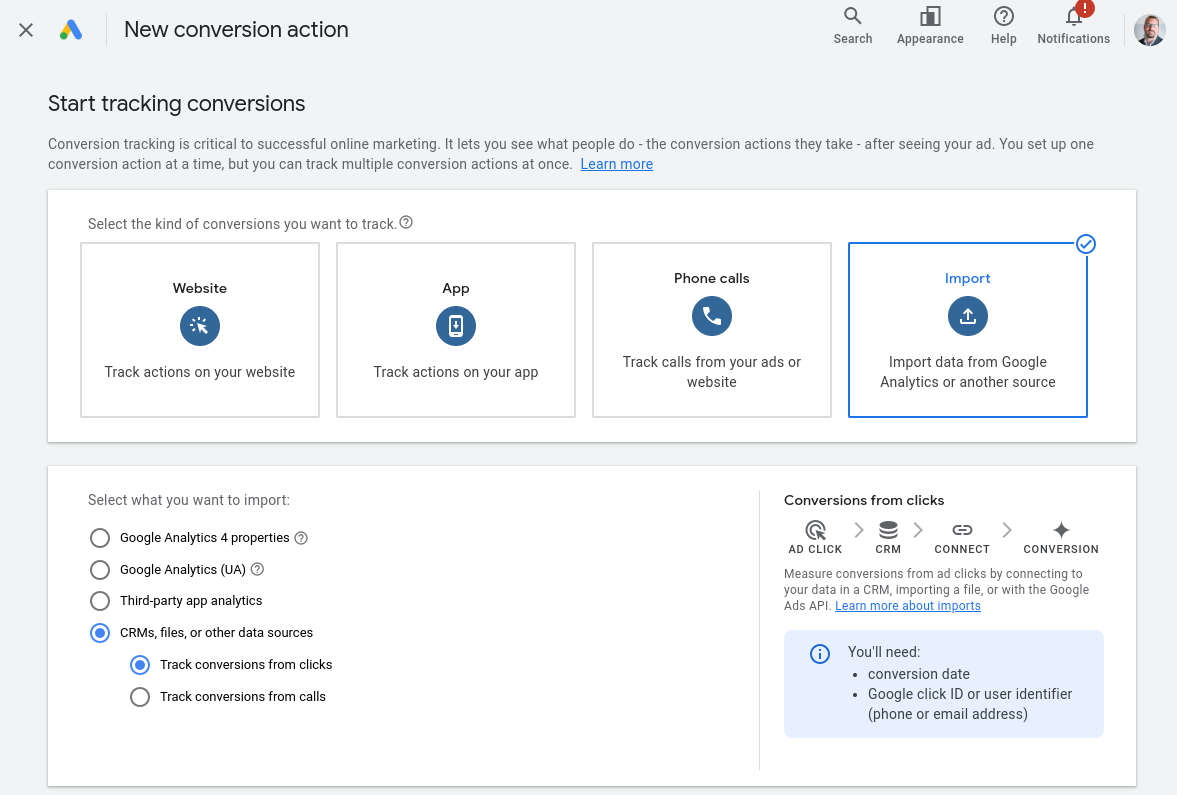
| Note: In early 2024, the “Linked Accounts” page under Admin was moved to “Data manager” under Tools. Google consolidated capabilities in their Ads Data Manager, which is a data import and management tool that lets you bring your customer data and activate it in Google Ads. |
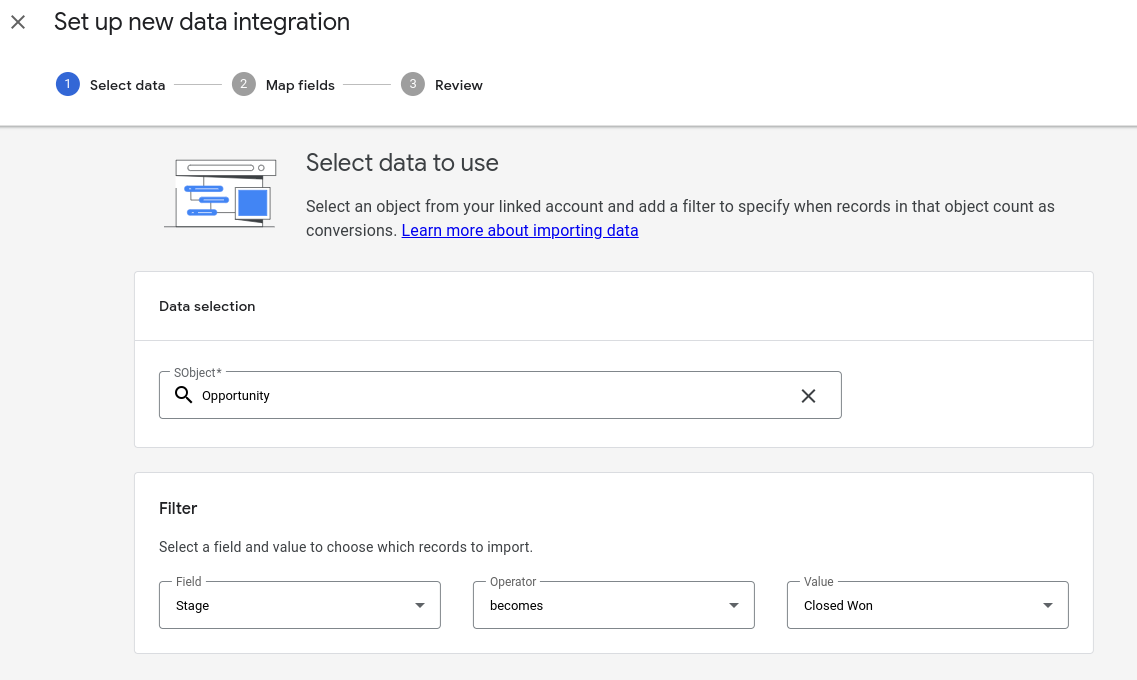
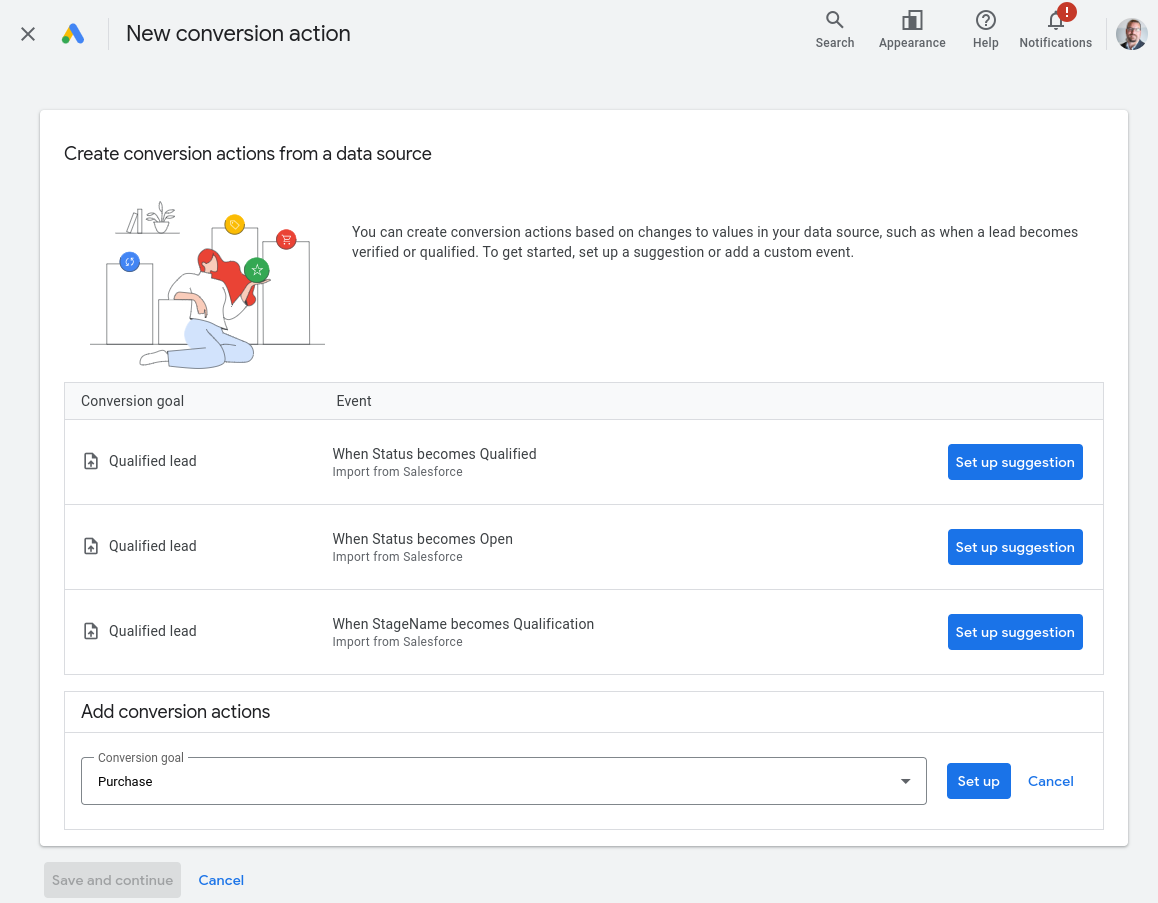
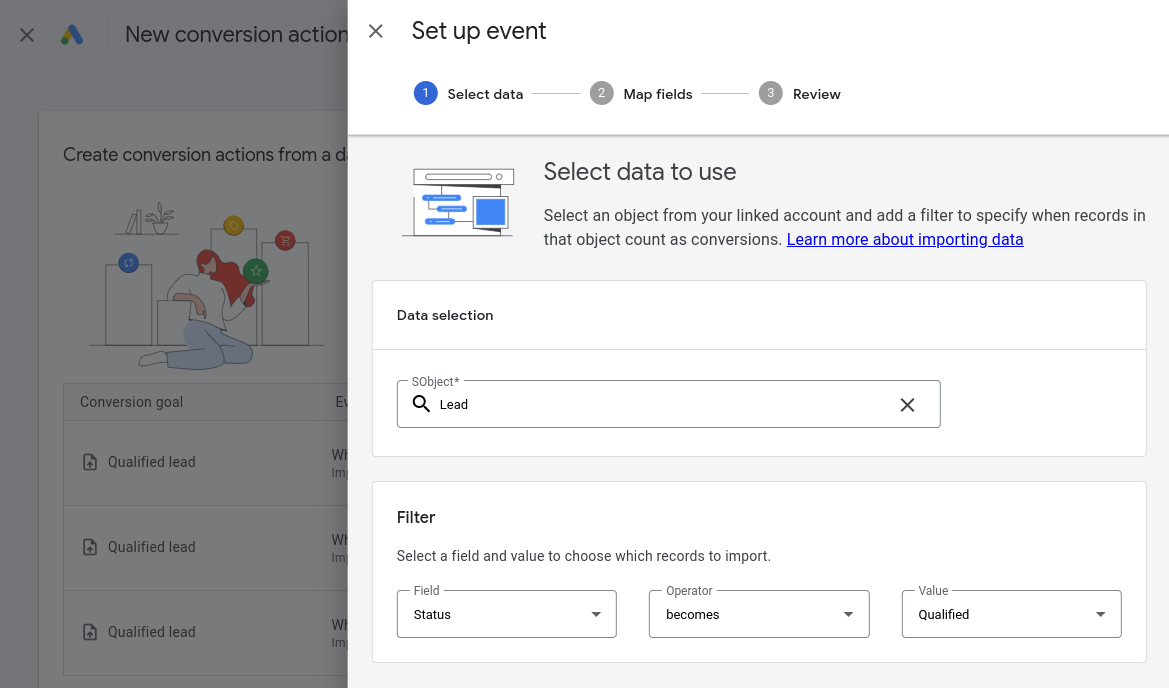
Once your Data Manager Connection is set up above, you can create multiple Conversion Actions related to your Salesforce milestones
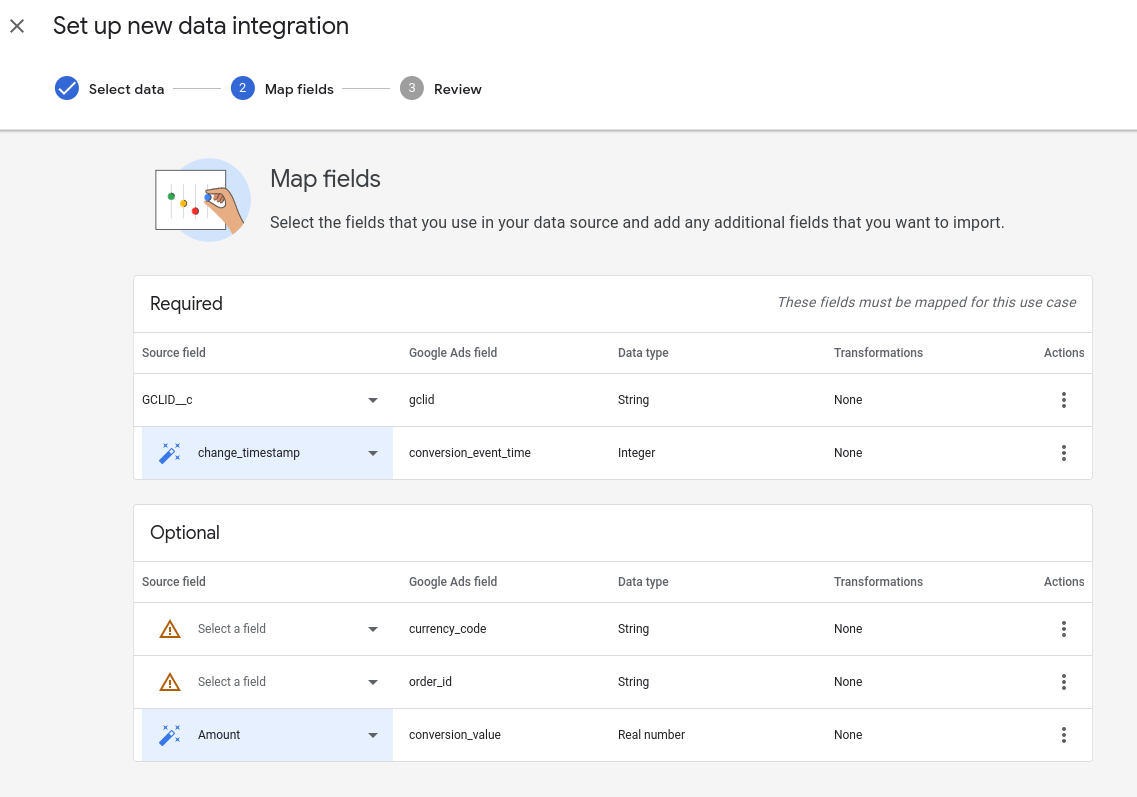
With the setup above, you will be able to associate Opportunity stages with conversion actions, but not Lead Status. (This setup uses a GCLID field on the Opportunity, pulling from a CloudAmp Gclid field on the Lead to make setup easier).

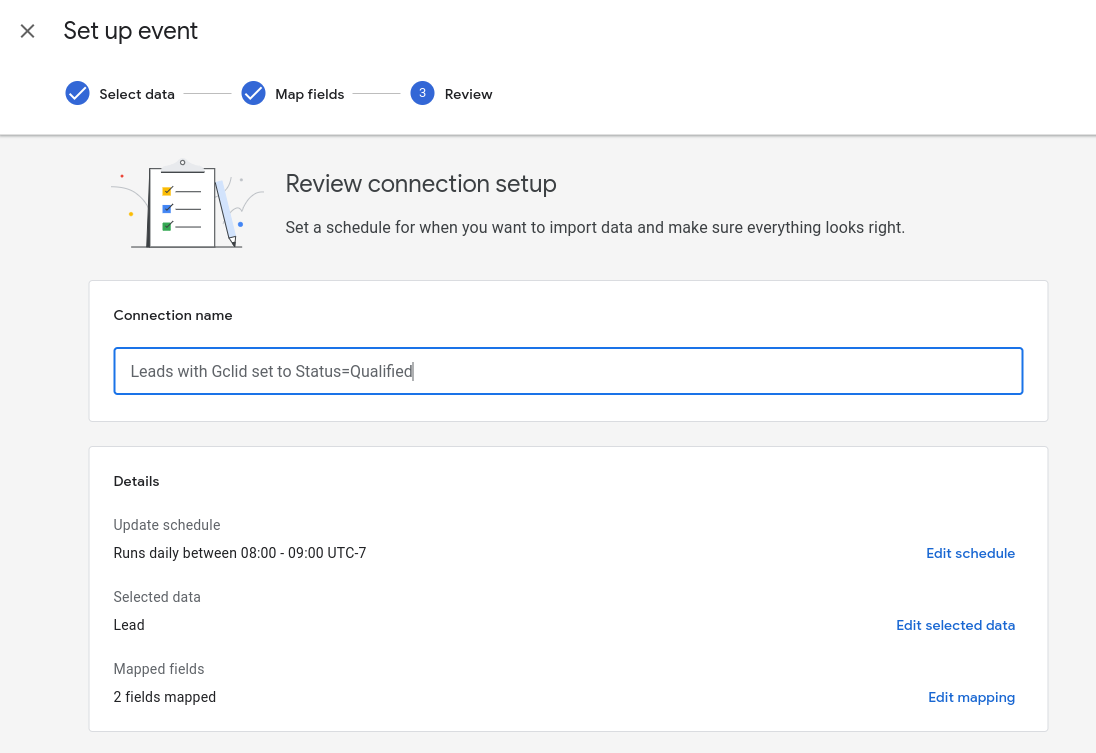
You can also create a connection using the Google Ads Data Manager to pull in Salesforce Leads, so you can have conversion actions based on Lead status changes.
Once you have connected Salesforce and Google Ads, you can review the history of successful imports from Salesforce to Google, and view the conversion data.
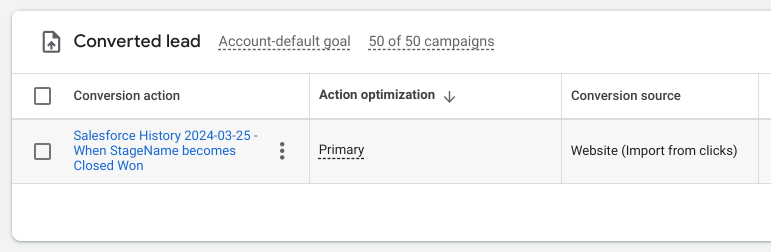
You may see other Conversion Goals you have previously set up, such as Google Analytics goals if it is connected to Google Ads, or other systems. The Salesforce conversions will be shown under the Conversion Source = Website (Salesforce.com) or Website (Import from clicks)

There are a number of columns in the Conversions view that will show Cost Per Conversion, Conversion Rate, and more data.
Under the Attribution menu item, you can drill down to individual Salesforce conversions, to see the source Campaign and even keywords.
On the Salesforce side, you can use Google Ad data, such as utm campaign and keyword values, to make decisions about where to allocate budget. For example, if you see that keyword 1 is driving the bulk of your Closed Won deals, while keyword 2 produces lots of leads that do not convert, it might be time to increase the budget for keyword 1 clicks (and potentially cut keyword 2, if it is producing unqualified leads).
When we now move to the Google side, you can see this in your imported data, and allow Google Ads to use it for optimization.
One thing to note is that Goals set as secondary actions are not visible in your campaigns, but simply live on your goals page for monitoring and observation.
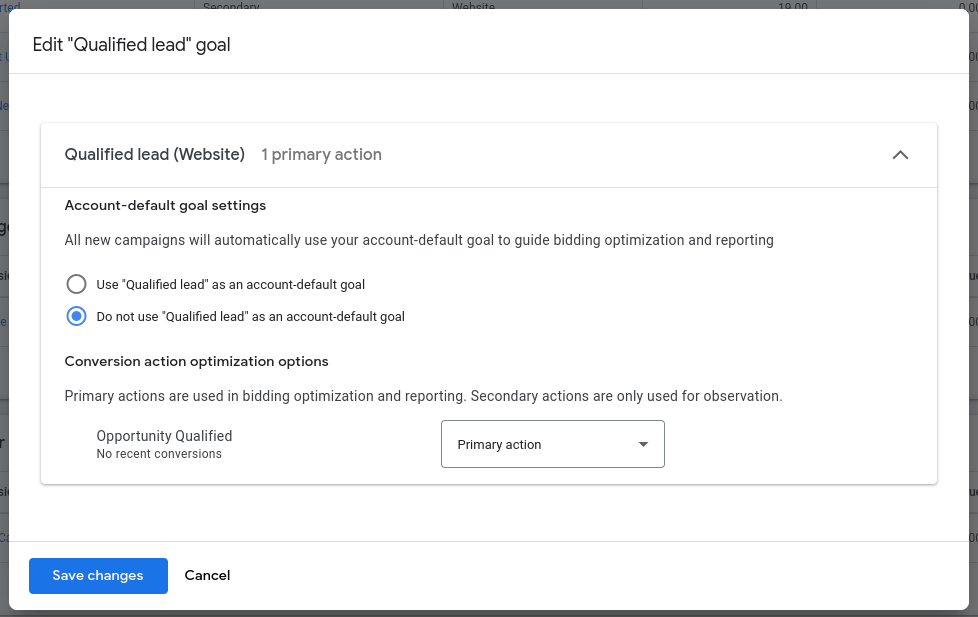
Primary or secondary actions included in a custom goal and selected at the campaign level will be reported in the “Conversions” column.
We recommend making your Salesforce data Primary so you can see the conversions, and you may also wish to create multiple goals — one for Closed Won deals, and other Goals for earlier stages during the sales process or even Closed Lost deals.
As you can see, there are many options to connect Salesforce and Google Ads, and a number of different ways it can be configured. If you need assistance setting up the GCLID integration with Salesforce, and optimizing your Google Ads with Salesforce lead and opportunity conversion data, CloudAmp can help.
Not yet a CloudAmp customer? The CloudAmp Campaign Tracker is an affordable monthly subscription, and has a 30 day no obligation trial so you can test it out in Salesforce. To get more data about your Leads in Salesforce, including full source attribution and page view data to prove ROI and improve your marketing, contact us for more information today.
About Google Ads Conversion Import for Salesforce
Link Salesforce and Google Ads accounts
Import conversions from Salesforce
Understand your conversion tracking data
About the “Data manager” page and Product Linking

|
David Hecht Founder, CloudAmp |
| CloudAmp Apps for Salesforce |
Know where your best Salesforce leads come from, and track marketing ROI more easily.