How to Connect Salesforce and Google Ads

If you track Leads and Opportunities in Salesforce’s Sales Cloud, you can link your Google Ads account to import your conversions from Salesforce into Google Ads. This will help you better measure how your online Google Ad spend is generating offline conversions and revenue, as well as allow Google to optimize your advertising using Salesforce Opportunity data if you choose.


If you are using the CloudAmp Campaign Tracker to attribute advertising campaigns to your leads, you are already capturing the key that connects the two systems – the Google Click ID, or Gclid. In that case the setup is much quicker and easier than it would be otherwise, and you can skip to section 3, Salesforce Configuration Steps. Otherwise, read on.


(Note: even if you are not using CloudAmp, these steps will help you connect Salesforce and Google Ads. Whether you use different Salesforce lead attribution software, or plan to have your web developer capture the Gclid with custom website form code, the basic steps are the same.)


In this guide, we’ll show you how to set Salesforce to import conversions into Google Ads. Topics include everything from tagging on the Google side, to your Salesforce setup, all the way to using the conversion data in Google.


  1. Enable Auto-tagging in Google Ads
  2. Capturing the Gclid In Salesforce
  3. Salesforce Configuration Steps
  4. Link Salesforce and Google Ads accounts
  5. Understanding Conversion Data
  6. Using Salesforce Conversion Data in Google
  7. External Resources

Enable Auto-tagging in Google Ads

Your first step in connecting Salesforce and Google ads is to make sure Google is adding the Gclid parameter to your ad URLs, a process known as “auto-tagging”. This setting may already be enabled, since it is required for connecting Google Ads to Google Analytics, as well as for Google Ads website conversion tracking. But it’s best to make sure, as without the Gclid parameters, the rest of this configuration won’t work.

What is a Gclid?

When someone clicks on a link in one of your Google Ads, your website will see the Gclid, or “Google Click ID” value in the incoming URL. The Gclid is a unique, long string of letters and numbers that identifies the particular ad a visitor clicked on in Google’s system.


When that visitor submits a form on your web site, and creates a Lead in Salesforce, the CloudAmp Campaign Tracker automatically adds that Gclid to the lead record. If you use a different technology to capture UTM and other url parameters, you may be able to get the Gclid a similar way.


When a Lead is converted, and creates an Account, Contact and Opportunity, the Gclid follows along to the Contact, as well as to the Opportunity (once you have completed the setup below).


Google Ads will then periodically check Salesforce, to see if any of the Opportunities with Stages (as you configure during the setup) are associated with the unique Gclid IDs. If so, it will count those stages as conversions attributed to that particular Google Ad click.


How to Turn On Auto-tagging in Google Ads


Enabling auto-tagging in Google Ads is easy. Once you are logged in to your Google Ads account, simply do the following:

  1. Click Admin from the left side menu
  2. Click the Account Settings tab
  3. Click the Auto-tagging section
  4. Select “Tag the URL that people click through from my ad.”
  5. Click Save


Auto-Tagging Considerations

Auto-tagging is simple to enable, but there are a few situations where it may cause issues. If you have special redirects on your web site, be sure they can handle long parameters, as the gclid value can be up to 100 characters long.

In addition, some websites are not compatible with auto-tagging because they do not allow arbitrary parameters in URLs. Occasionally web servers rewrite the case of incoming URLs to all lower case letters as well, which won’t cause errors but can throw off the tracking data, since gclid values can contain both uppercase and lowercase letters. Both of these situations are pretty rare, but if you have any issues during testing, you might check with your web developer.


Manual Tags and Auto-Tagging


In the past it was not recommended to enable auto-tagging if you also had manual tags (like utm parameters) in your Google Ad urls. This was because in certain cases it could result in duplicate or conflicting tracking data, but that issue has been largely resolved. 


Many customers today use both auto-tagging and manual UTM tags, since manual UTM parameters are required for systems like CloudAmp to capture data into Salesforce, as well as providing a tracking data source independent of the Google ecosystem.


Note: If you are using both manual tags and gclids via auto-tagging, on the Google Analytics side there is a setting to “Allow manual tagging (UTM values) to override auto-tagging (GCLID values).” That way your manual UTM tags can override but be supplemented the values from the gclid at the same time. 


If you are using Google Analytics for conversion tracking, you may wish to have that setting disabled. That way, Google Analytics will pull its internal values from the Gclid, rather than using the manual UTM tags. The manual tags will still be available for reporting in Salesforce via CloudAmp or other systems, but there won’t be any potential for conflict (such as the default medium of cpc being overridden to a value from your manual utm_medium tag). For more details, check out Google’s documentation, since Google Analytics is a whole different topic, outside the scope of this guide to connecting Google Ads and Salesforce!


Capturing the Gclid In Salesforce

If you have developed custom code to populate UTM parameters and other source data in your Salesforce web-to-lead forms, then you should ask your web developer to begin capturing the GCLID value as well. Google provides some sample javascript code in its documentation for how to “Edit your website to collect and save the click ID.


For most marketers, your marketing attribution software should be able to automatically capture the GCLID. Since CloudAmp publishes the Campaign Tracker software for Salesforce, which automatically captures the GCLID (as well as other advertising IDs, like Microsoft’s MSCLKID), we are going to provide instructions based on our own app.


First install the CloudAmp Campaign Tracker in Salesforce, and add the tracking script to your website footer. Setup can normally be done in minutes, depending on your ability to update your website. For a quick overview of the process, see our Quick Start Guide.

Once the Campaign Tracker is up and running, you can test to make sure the GCLID parameter is successfully showing up in Salesforce. No need to click on one of your ads, you can use our spreadsheet template download to generate test URLs, and then add a test GCLID parameter at the end of any URL in this format:


&gclid=9949435394i5322urwiehr


So a test URL format would be similar to:


https://www.yoursite.com?utm_campaign=CampaignOct23&utm_medium=PPC&utm_source=Google&utm_id=Goog_04&utm_content=Adgroup3&utm_term=Keyword3&gclid=9949435394i5322urwiehr


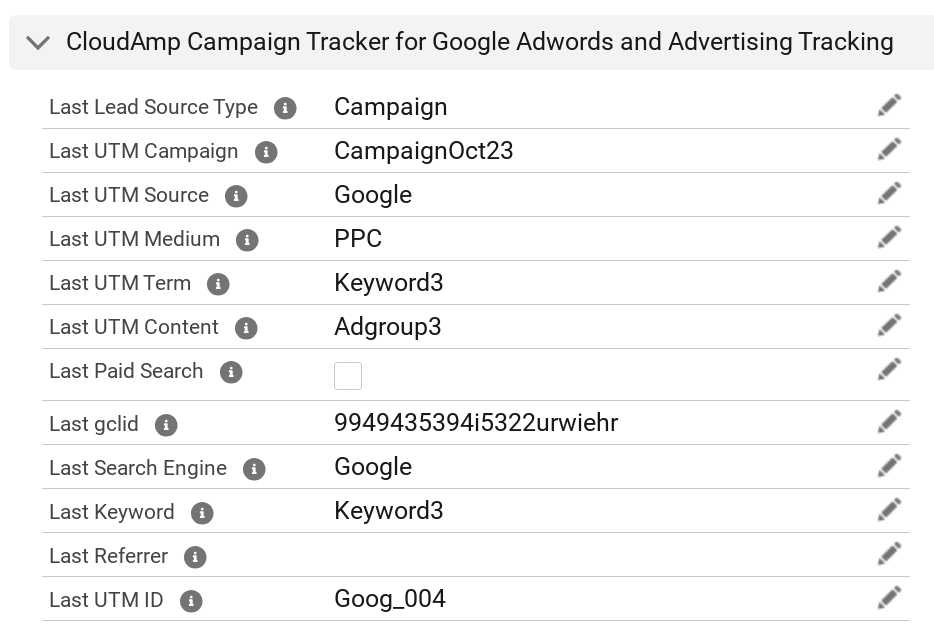
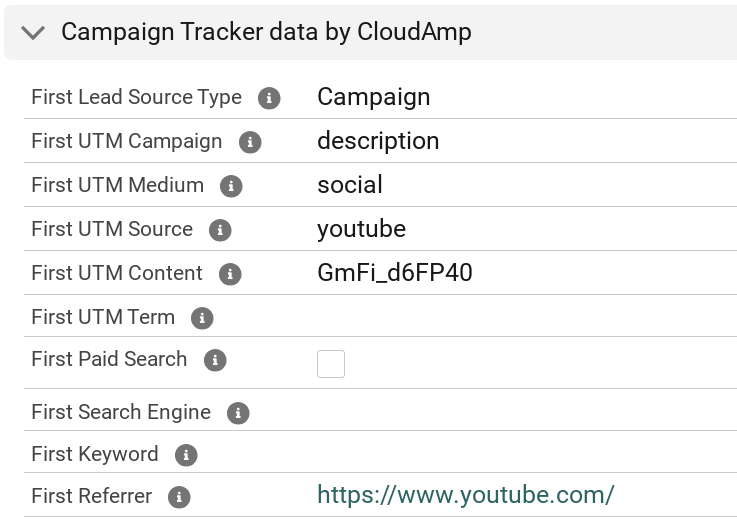
Once you have submitted a test lead or two, check Salesforce. You should see the value from your URL in either the “First gclid” or “Last gclid” field on the new lead:


Salesforce Configuration Steps

Now that you are successfully capturing the GCLID in new Salesforce leads, it is time to add the field required by Google for linking to Salesforce. Using CloudAmp, we’ll just map the CloudAmp GCLID field to the field that Google is looking for in its integration.


1. Add GCLID field to Salesforce Opportunity

  1. Click on the Gear Icon and select Setup
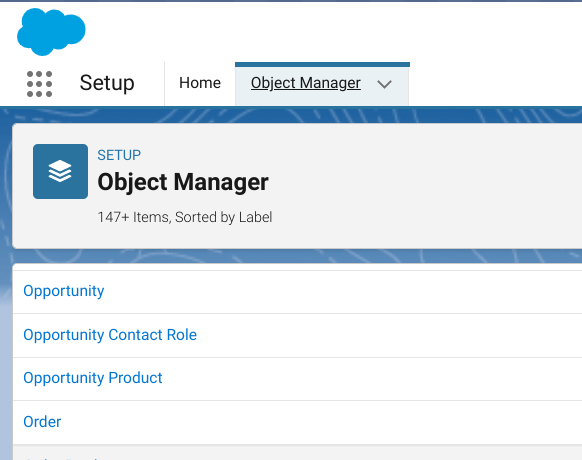
  2. Go to Object Manager and select Opportunity
  3. Click Fields & Relationships on the left side
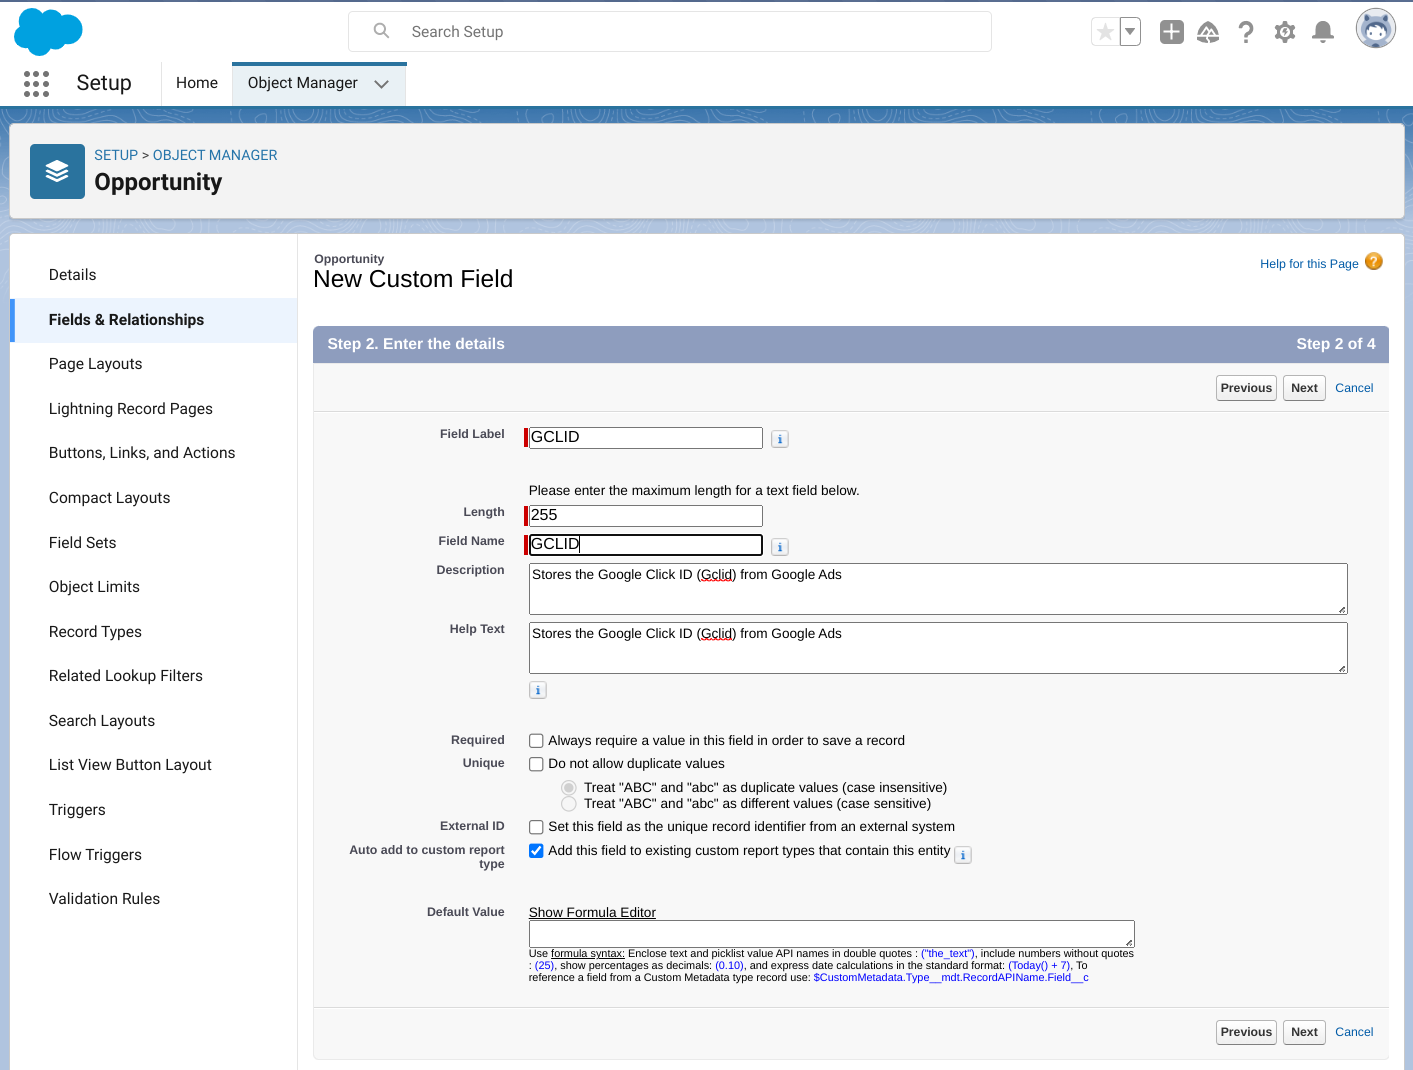
  4. Click New and then select Text to create a custom field with the Field Name “GCLID” (in all capital letters, without the quotes). 
    1. The “Field Label” can be anything you want.
    2. Set the field length to 255 characters.
    3. Make this field read-only so your users don’t accidentally alter it.

2. Check the Opportunity History Tracking


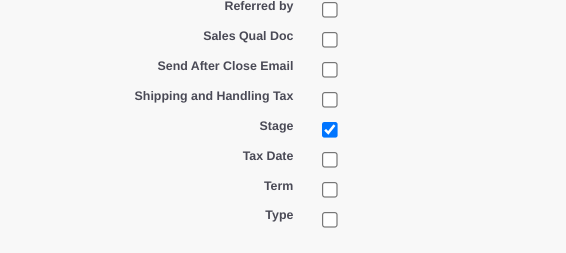
  1. Click Set History Tracking button top right
  2. Enable field history tracking for the “Stage” field.

3. Map Campaign Tracker Lead Fields to the New Opp Fields


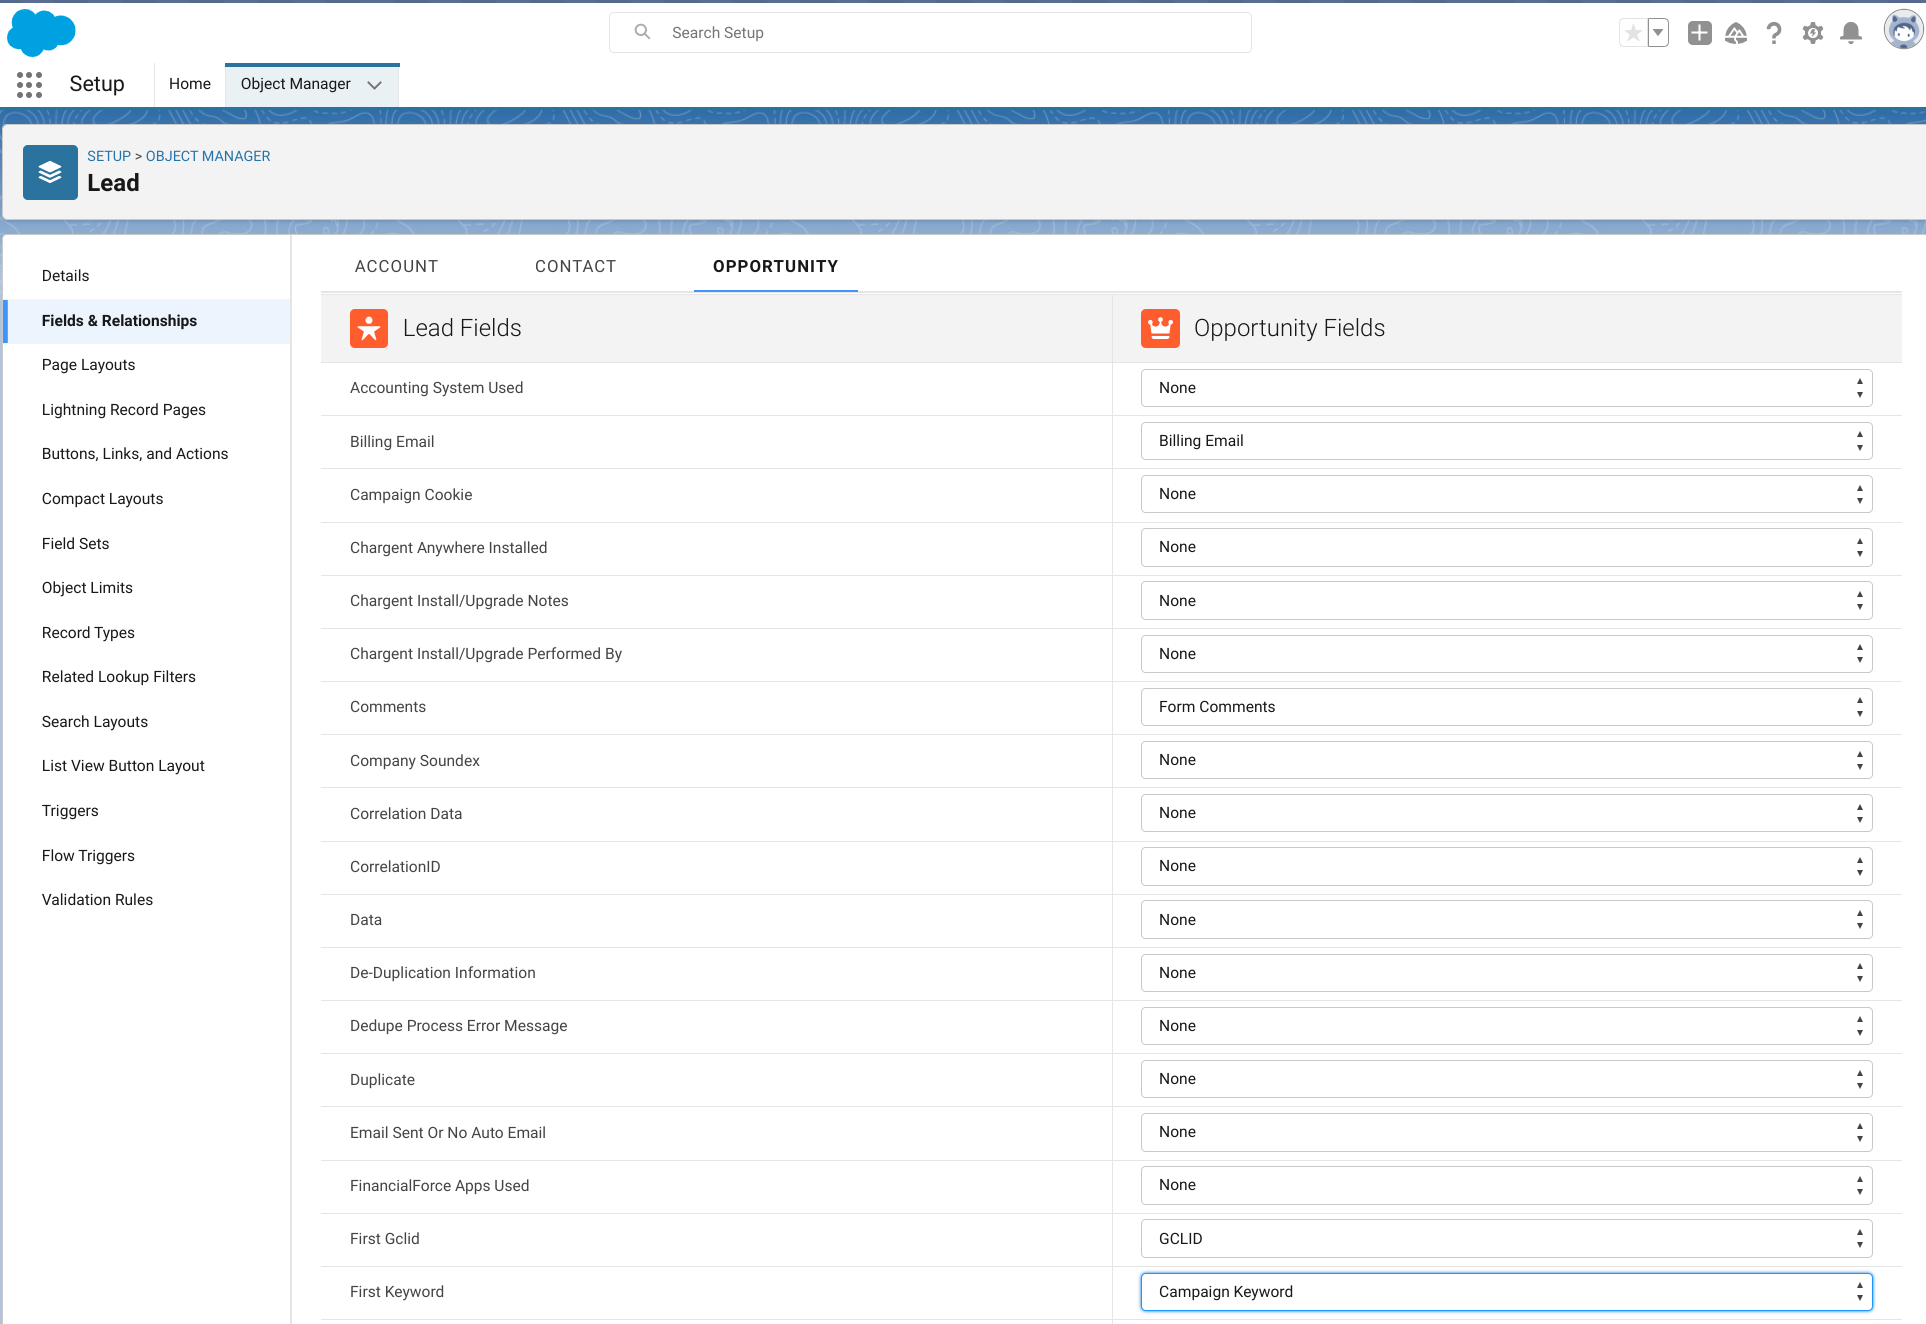
  1. Go to Object Manager and select Lead
  2. Click Fields & Relationships on the left side
  3. Click Map Lead Fields button top right
  4. Click Opportunity in the center to the right of Account and Contact columns
  5. Scroll down to First Gclid. Select the GCLID field you just created in the right hand column
  6. Click Save at the bottom of the page


Link Salesforce and Google Ads accounts


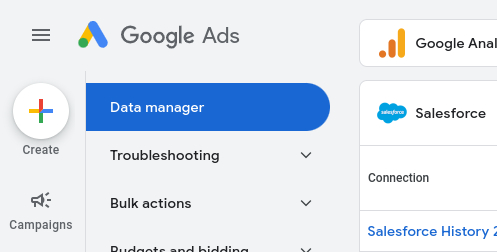
Note: In early 2024, the “Linked Accounts” page under Admin was moved to “Data manager” under Tools. Google consolidated capabilities in their Ads Data Manager, which is a data import and management tool that lets you bring your customer data and activate it in Google Ads.

Connect Salesforce Opportunities to Google Ads


  1. Sign in to your Google Ads account.
  2. Click Tools from the left side menu
  3. Click Data Manager on the left side.
  4. Click the + Connect Product blue button
  5. Choose Salesforce as your data source
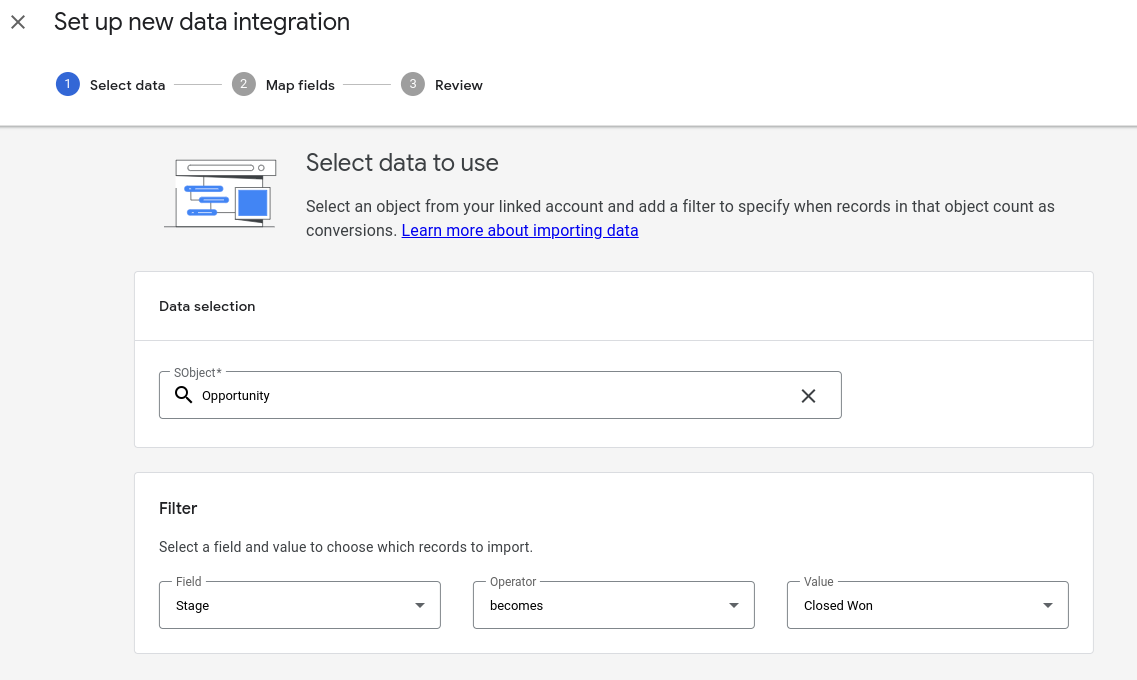
  6. Select the SObject (Saleforce object) that you wish to import data for, such as Opportunity
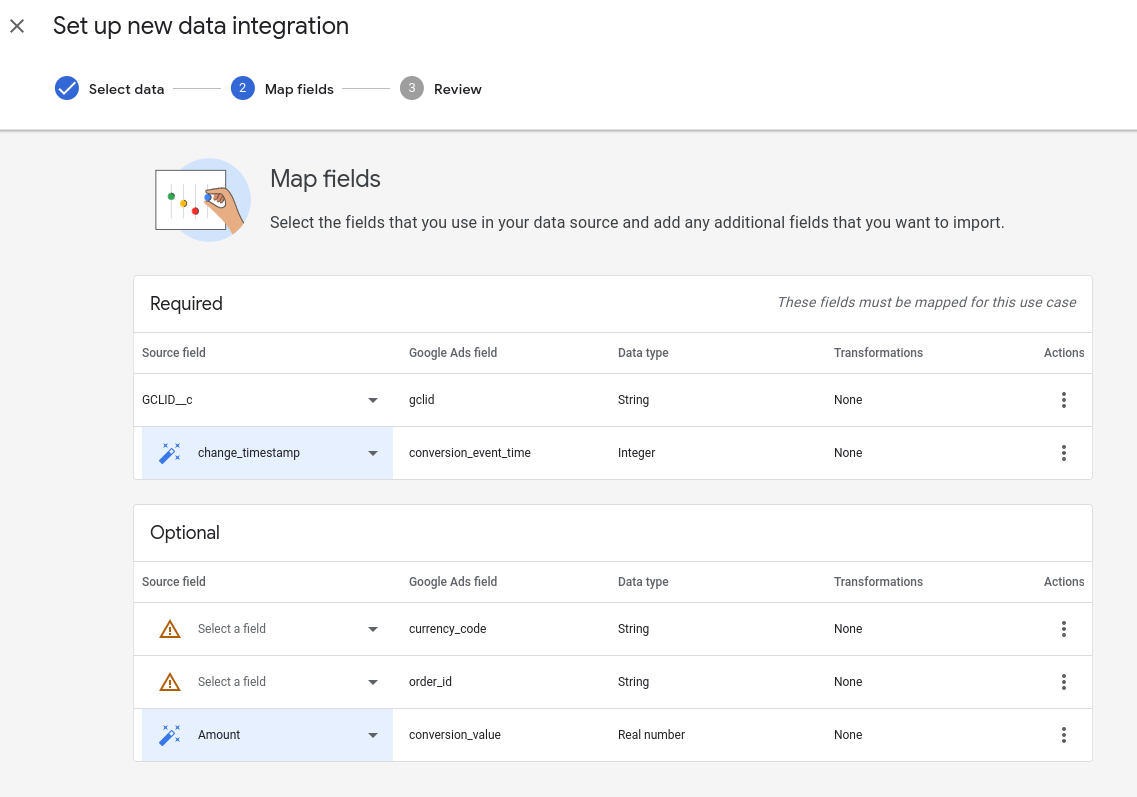
  7. When the source fields from Salesforce appear, Edit the Field Mapping
    • Ensure GCLID_c field that you created earlier in Salesforce is mapped to the gclid field in Google Ads
    • Ensure the change_timestamp is mapped to the conversion_event_time in Google ads (this is why the history tracking was enabled in earlier setup steps)
    • You can also map optional fields, such as Amount


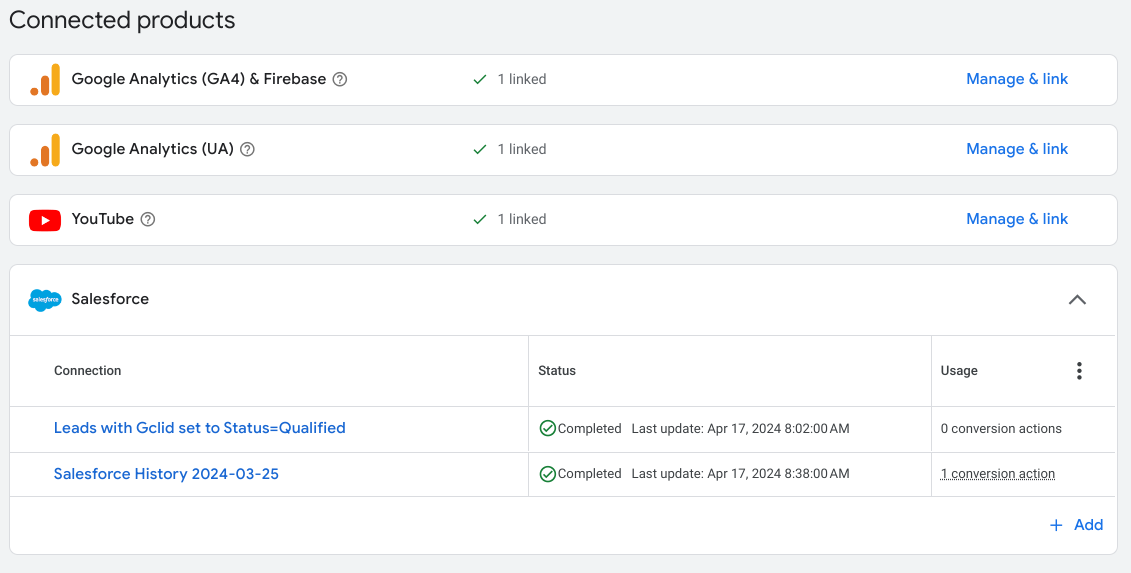
Once your Data Manager Connection is set up above, you can create multiple Conversion Actions related to your Salesforce milestones


Connect Salesforce Leads to Google Ads


With the setup above, you will be able to associate Opportunity stages with conversion actions, but not Lead Status. (This setup uses a GCLID field on the Opportunity, pulling from a CloudAmp Gclid field on the Lead to make setup easier).

You can also create a connection using the Google Ads Data Manager to pull in Salesforce Leads, so you can have conversion actions based on Lead status changes.


  1. Set up the connection to Salesforce leads in the Data Manager, in the same way that Opportunities were set up
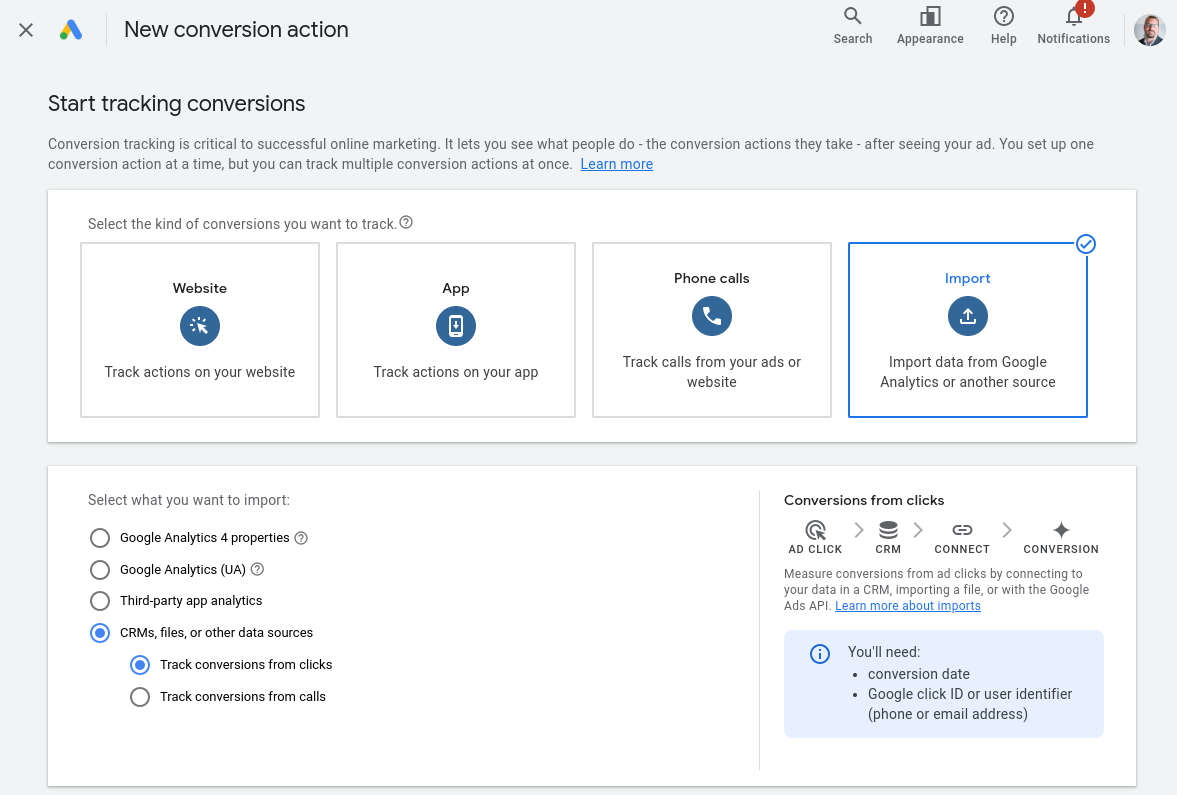
  2. Under Goals, click the +New Conversion Action button
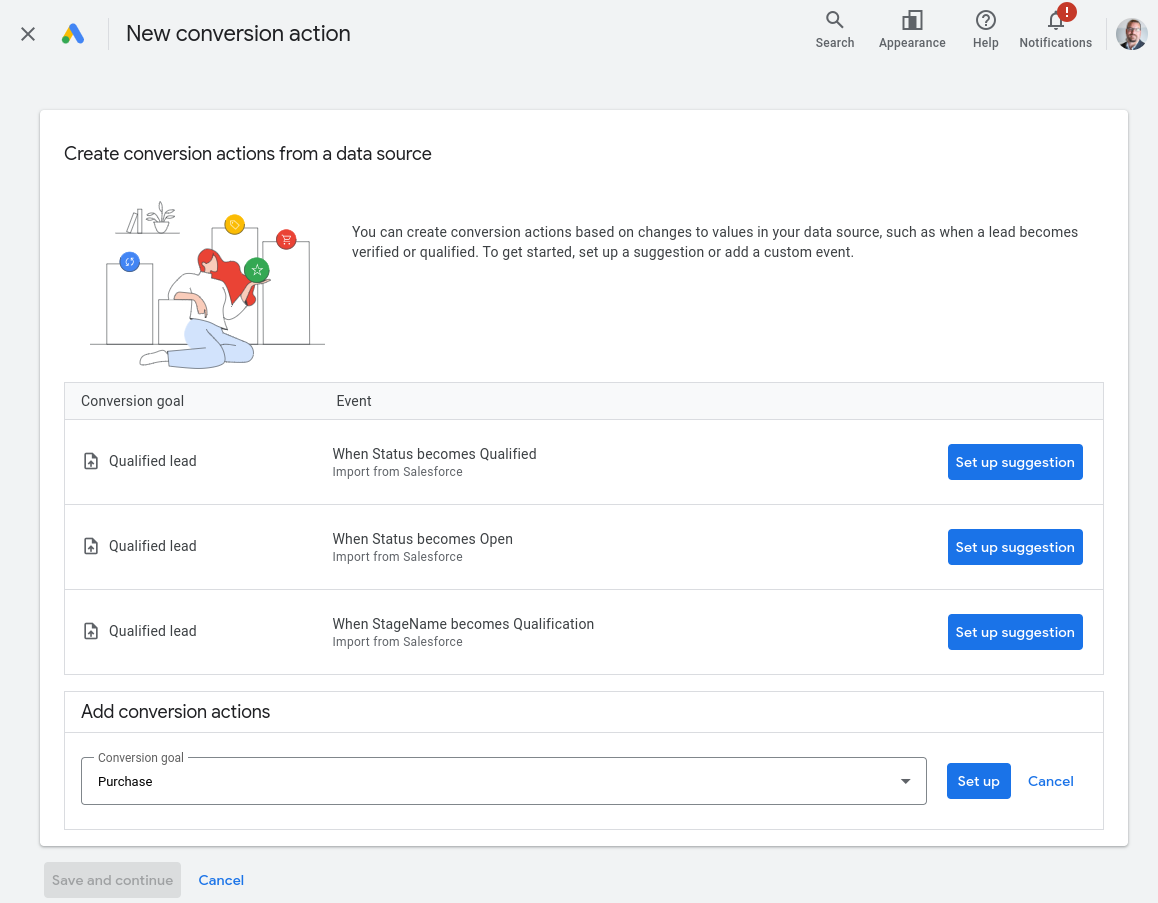
  3. After selecting your data source, choose a conversion action
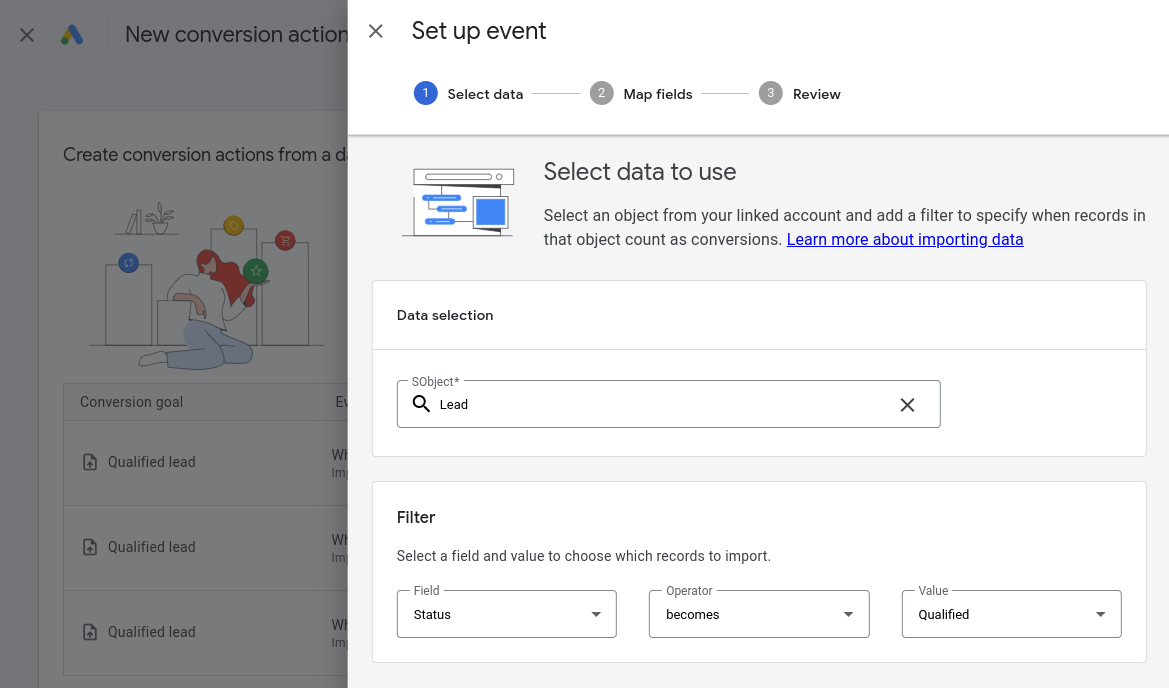
  4. Select one of the SObjects you have already created a connection to (Lead or Opportunity)
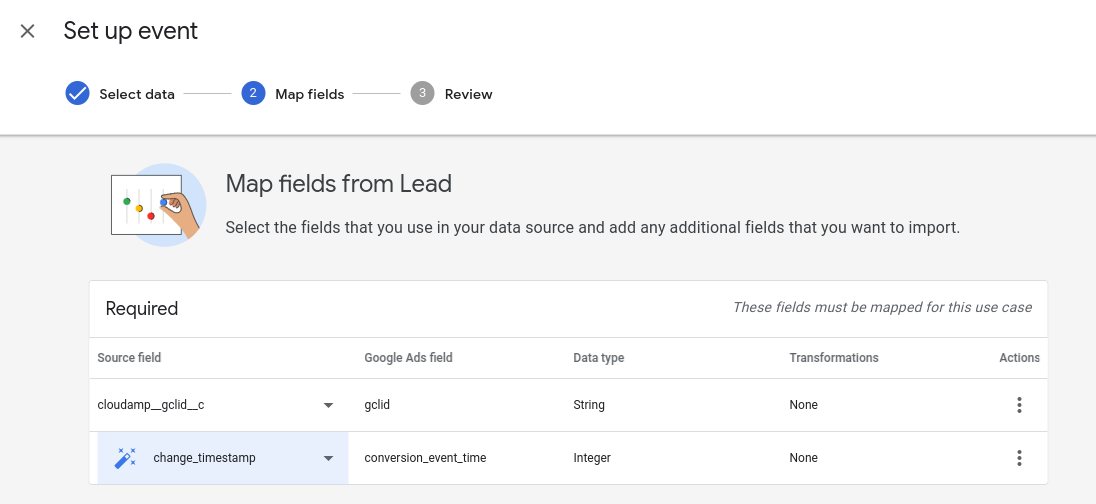
  5. To set up a Lead, select the cloudamp__gclid__c field to match to the gclid in Google Ads
  6. Select the change_timestamp field from Salesforce, where values might change, and history tracking is enabled on that field
    1. In this example below, make sure that Field History Tracking in Salesforce is enabled on the First Gclid field on the Lead object.
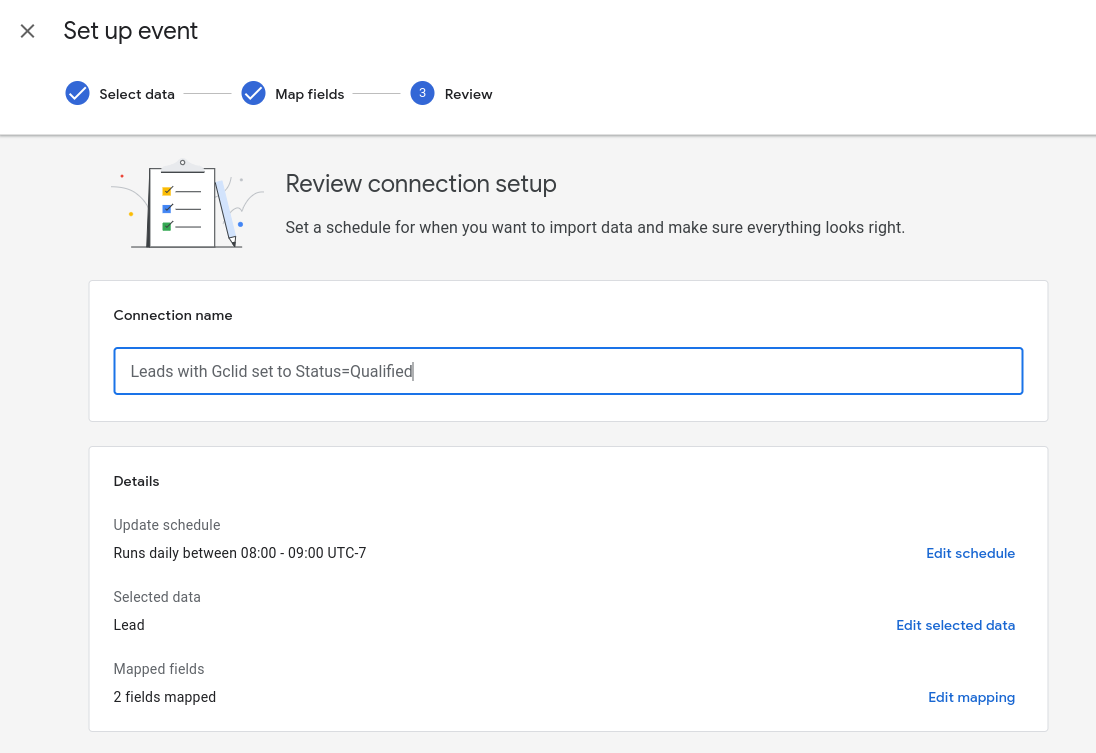
  7. Name the connection, and set the import schedule.


Understanding Conversion Data


Once you have connected Salesforce and Google Ads, you can review the history of successful imports from Salesforce to Google, and view the conversion data.

  1. Log into your Google Ads account, and click the Goals icon .
  2. Click Conversions.
  3. Click Summary.
  4. You can hover over the titles at the top of each column to see a definition of that conversion action.


You may see other Conversion Goals you have previously set up, such as Google Analytics goals if it is connected to Google Ads, or other systems. The Salesforce conversions will be shown under the Conversion Source = Website (Salesforce.com) or Website (Import from clicks)

There are a number of columns in the Conversions view that will show Cost Per Conversion, Conversion Rate, and more data.


Under the Attribution menu item, you can drill down to individual Salesforce conversions, to see the source Campaign and even keywords.


Using Salesforce Conversion Data in Google


On the Salesforce side, you can use Google Ad data, such as utm campaign and keyword values, to make decisions about where to allocate budget. For example, if you see that keyword 1 is driving the bulk of your Closed Won deals, while keyword 2 produces lots of leads that do not convert, it might be time to increase the budget for keyword 1 clicks (and potentially cut keyword 2, if it is producing unqualified leads).


When we now move to the Google side, you can see this in your imported data, and allow Google Ads to use it for optimization.


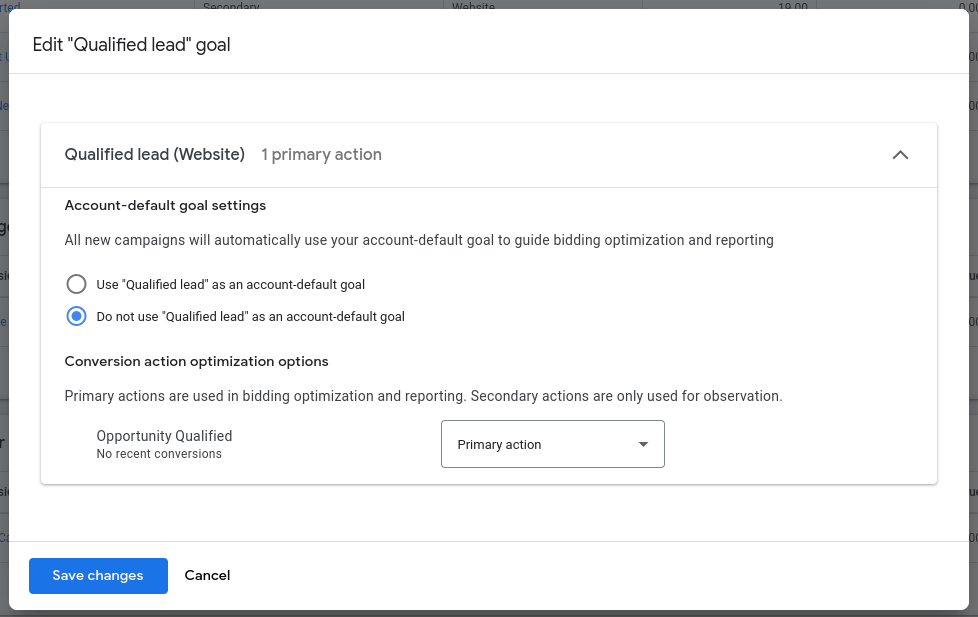
One thing to note is that Goals set as secondary actions are not visible in your campaigns, but simply live on your goals page for monitoring and observation.

Primary or secondary actions included in a custom goal and selected at the campaign level will be reported in the “Conversions” column.


We recommend making your Salesforce data Primary so you can see the conversions, and you may also wish to create multiple goals — one for Closed Won deals, and other Goals for earlier stages during the sales process or even Closed Lost deals.


Get Help from CloudAmp


As you can see, there are many options to connect Salesforce and Google Ads, and a number of different ways it can be configured. If you need assistance setting up the GCLID integration with Salesforce, and optimizing your Google Ads with Salesforce lead and opportunity conversion data, CloudAmp can help.


Not yet a CloudAmp customer? The CloudAmp Campaign Tracker is an affordable monthly subscription, and has a 30 day no obligation trial so you can test it out in Salesforce. To get more data about your Leads in Salesforce, including full source attribution and page view data to prove ROI and improve your marketing, contact us for more information today.


External Resources


About Google Ads Conversion Import for Salesforce

Link Salesforce and Google Ads accounts

Import conversions from Salesforce

Understand your conversion tracking data

About the “Data manager” page and Product Linking


Marketing on Salesforce without Marketing Cloud

Most Salesforce customers use the original Sales Cloud (Leads, Accounts, Contacts, & Opportunities). And while the add-on Marketing Cloud is a powerful product with a lot of benefits in terms of automation and scale, it is not a fit for all organizations using Salesforce.


Some of the reasons that organizations using Salesforce Sales Cloud may choose not to purchase Marketing Cloud include the following:


  • Budgetary limitations
  • New to Salesforce and want to implement basics first
  • Marketing team not in place or just one person
  • Email marketing software already in place or part of another system
  • Target audience not receptive to frequent marketing messages (eg. technical buyers)


The good news is, Salesforce Sales Cloud already has a number of capabilities to drive your Sales and Marketing. And for the gaps that you may find, a wide variety of affordable apps exist on the Salesforce AppExchange.


To give you an overview of how you can manage your marketing on Salesforce, with or without Marketing Cloud, we’ll be covering the following topics:


  1. Sales Cloud vs. Marketing Cloud
  2. Salesforce Campaigns
  3. Salesforce Lead Management & Forms
  4. Track Your Advertising in Salesforce
  5. Website Activity Tracking in Salesforce
  6. Salesforce Email Marketing


Sales Cloud vs. Marketing Cloud

First off, let’s define the differences between Salesforce’s Sales Cloud and Marketing Cloud products, to explain how they work together, and be sure you understand the differences!


The Salesforce Clouds (Sales, Service, Marketing, and Commerce) are standalone, meaning they can be used separately and independently. But they can also be connected to share data across the different capabilities of each cloud.


Sales Cloud is the most common, and what many people think of when they think of Salesforce. “Salesforce Classic” you might think of it as, the one that started all the way back in 1999.

Both Sales Cloud and Marketing Cloud track leads along their journey to become your customers. Sales Cloud has a lot more features to create and manage customers and revenue, including forecasting and pipeline management. In addition to the Leads, Accounts, Contacts and Opportunities that everyone knows, it can manage Contracts, Products and Quotes as well, for managing the full sales cycle. 


Sales Cloud does have lead generation capabilities as well, including web-to-lead forms that post leads from your website into Salesforce, lead assignment rules, autoresponder emails and more.


Salesforce Sales Cloud vs. Salesforce Marketing Cloud:
Functional Areas Comparison

Salesforce Sales Cloud Salesforce Marketing Cloud Account Engagement
Lead Management Lead Scoring and Analytics
Account Management Lead Nurturing (Journey Builder)
Contact Management Email Marketing Tools
Opportunity Management Social Media Integrations


Marketing Cloud is made up of several different products. The main Marketing Cloud product can send a LOT of email to consumers. Marketing Cloud Account Engagement, formerly known as Pardot, has more nurture and automation features, for longer B2B sales cycles. It is good for large scale email drip campaigns, where you send a series of automated emails to leads or customers based on various criteria such as demographics, behavior and communications preferences.


Marketing Cloud also has a number of features to help with Account Based Management (ABM), including tracking website activity and scoring a prospect’s engagement level with content. While it is possible to use some Marketing Cloud features without Salesforce Sales Cloud, the full capabilities of the product are only available when it is integrated with Salesforce. It would be safe to say that most Salesforce Marketing Cloud customers are also purchasing Sales Cloud.


Salesforce Campaigns

While many people might use Campaigns with Marketing Cloud, Campaign records are actually part of Sales Cloud. Campaigns can be a powerful tool to use with Leads and Contacts, as well as Prospects in Marketing Cloud Account Engagement (fka Pardot).


You can use Salesforce Campaigns to create target audiences, and track responses and engagement. Both Leads and Contacts can be members of the same campaign, making it a good way to unify a marketing effort across groups of records which are normally separate in Salesforce.


Here is an overview of how you use Salesforce campaigns:


Create Campaigns

Creating Campaigns in Salesforce is easy, and you can define a lot or a little bit of information about each campaign, depending on your requirements.


  1. In the Salesforce App Launcher, select Campaigns.
  2. Enter a campaign name.
  3. Select the Active checkbox if you’re ready to roll out the campaign.
  4. Select the type of campaign (advertising, event, etc.).
  5. Select the status of the campaign.
  6. Enter a Start Date and an End Date.


There are other fields you can fill out, such as budget, should you choose. After saving, you can start to add people (leads and contacts) to the campaign.

Add Members to Campaigns

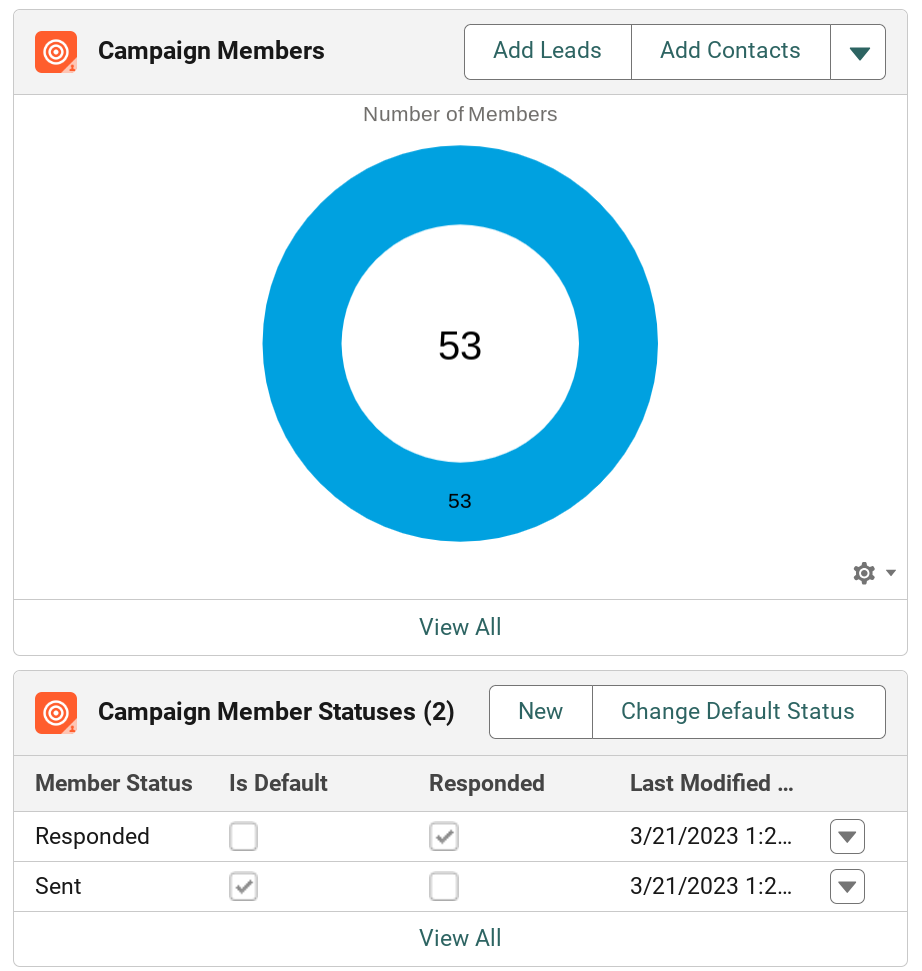
You can make Leads and/or Contacts members of a campaign, to send them emails, track whether they have responded, and more. Campaign members can be made up of both Salesforce leads and contacts, which is one of the useful features of Campaigns.


  1. Click Add Leads or Add Contacts
  2. You can also select Manage Campaign Members to import CSVs of Leads or Contacts
  3. For each Member, you can choose their Status when you add them
  4. Click Save

Members can also be added to Campaigns directly from a Lead, Contact, or Account record, or from list views on those objects.


Auto Assign Leads to Campaigns

You can have your website forms automatically assign leads as members of a particular Campaign when they are created in Salesforce. Just add a hidden field that passes the Campaign ID to Salesforce.

For more information, see the “Automatic Campaign Assignment for Leads” section of our blog post, “Which Form or Web Page did a Salesforce lead come from?


Salesforce Lead Management & Forms

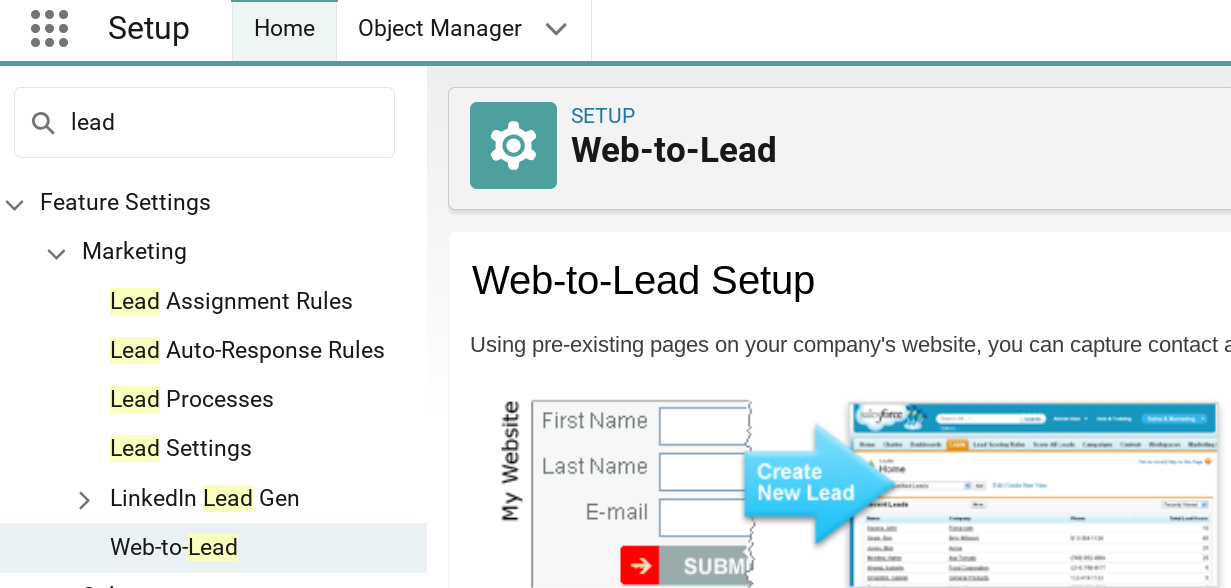
Salesforce Sales Cloud includes Web-to-Lead functionality, which gives you form code to place on your web site and collect leads. Some customization and styling with CSS is required, but Salesforce web-to-lead forms work well for getting prospect information into Salesforce.

How to Create a Web-to-Lead Form

You can generate HTML code for a form that will create Leads in Salesforce when your website visitors or prospects fill it out. Just follow these general steps, and then send the resulting code to your web developer.


  1. Go to Setup, type Web-to-Lead in the Quick Find box, then select Web-to-Lead.
  2. To enable or change Web-to-Lead settings, click Edit.
    1. There are various settings such as the Salesforce user that is shown as creating the leads from the form, as well as other settings. Consult the full Salesforce documentation for details on all the web-to-lead setting options.
  3. Click Save.
  4. To create a form for your website, click Create Web-to-Lead Form
  5. Select fields you want to include.
    1. You can include custom fields that you have previously created in Salesforce, such as information relevant to your product or service.
    2. Don’t include too many fields though — requesting more than a few key bits of information will reduce your number of leads.
  6. Copy the final code to send to your web designer or developer.
  7. Click Finished.


Salesforce Web-to-Lead Form Alternatives

Some Salesforce customers prefer to use third party form programs, such as FormAssembly or Gravity Forms. These options offer some additional functionality, and provide an online interface to make updates to the forms without needing to get your web developer involved each time. 


However, Salesforce web-to-lead is included as part of your standard Salesforce subscription, and does the job for most purposes. You can even capture information specific to your organization, by creating custom fields in Salesforce and adding them to your web-to-lead form. And you can keep using web-to-lead with Marketing Cloud Account Engagement via the Pardot form handler functionality, or use the Pardot forms instead.


Linkedin Advertising Leads

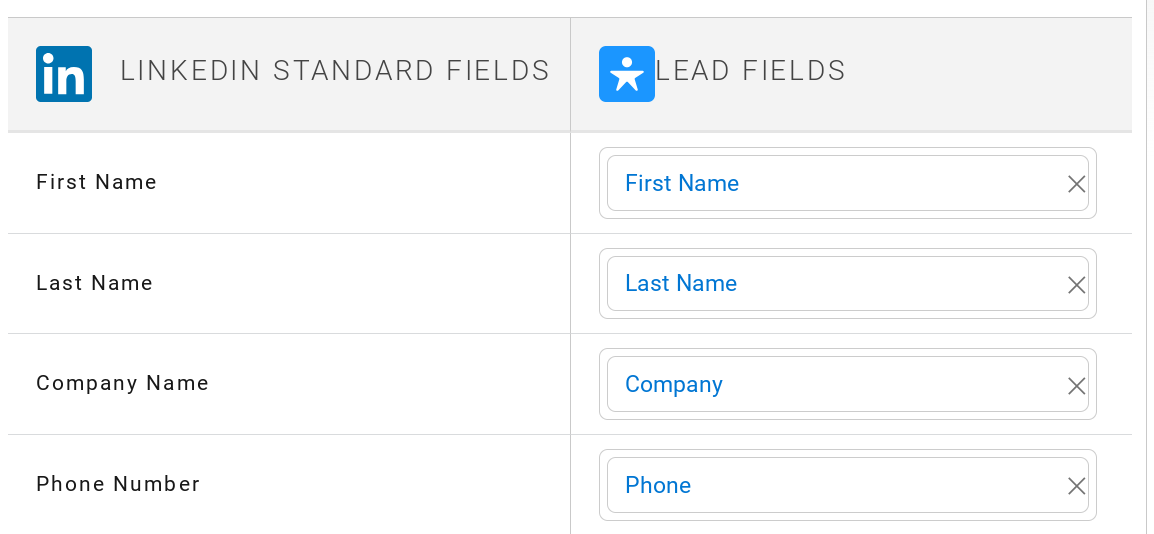
If your business uses Linkedin Lead Gen ads, you can set up a connection to Linkedin, where the leads submitted in your advertising come straight into Salesforce. This functionality is included standard in Salesforce Sales Cloud, but it does require Salesforce Web-to-Lead to be enabled.


  1. Go to Setup, type Linkedin in the Quick Find box, then select Linkedin Accounts.
  2. Connect your Linkedin account that has access to your LinkedIn ad accounts and company pages.
  3. Go to Lead Gen Fields in the Setup area.
  4. Under Map Form Data, choose the Salesforce lead fields to receive data from LinkedIn
  5. You can configure other settings as well.
  6. Test! (Fill out a form on one of your Linkedin ads)

Lead Assignment Rules

Sales Cloud also includes a feature to automatically assign new leads to users or queues, where users can grab them. For complex Sales territories, there are a variety of Salesforce AppExchange apps that can help assign leads, but out of the box you can have them assigned to a user or queue based on data that exists in any of the lead fields.


  1. Go to Setup, enter Assignment Rules in the Quick Find box, then select Lead Assignment Rules 
  2. Click New to create a new rule entry. For each rule, there are 3 areas you can set:
    1. Order – Number the rules in the order you would like them to run, when they evaluate a new lead
    2. Criteria – specifies the field and values that should match  in order for that assignment rule to be triggered.
    3. User – specifies the user or queue that the lead is assigned to

There are a variety of other settings and use cases that can be set up for this powerful Salesforce Sales Cloud lead management feature.

You can also configure related Lead Auto-Response Rules in a similar fashion, to send an automated email to new leads.


Pro tip: you can create a Delete queue in Salesforce, then use Lead Assignment Rules to filter out junk leads that escape your spam filters into that queue. If you don’t have any email notifications configured for the Delete queue, and filter leads owned by that queue out of your lead views, these junk leads will be far less bothersome, and will be easy for your Salesforce Administrator to clear out the delete queue periodically using Mass Delete Leads functionality.


Track Your Advertising in Salesforce

There is some marketing functionality within Salesforce Sales Cloud, but it doesn’t go terribly deep into lead enrichment or source information. The good news is, some of this functionality can be added through Salesforce partner applications on the Salesforce AppExchange very affordably.


Our CloudAmp Campaign Tracker, for example, can show you how your best leads found you, including campaigns, keywords, and which pages on your website a lead viewed.


If you are spending money on Google Ads or other online advertising, knowing which ads are producing your best leads can help you drive more sales and cut any ineffective campaigns. 

Ad Tracking for Salesforce

Marketers often find that some keywords or types of ads can produce a lot of leads, but some types of those leads will not convert to sales. This issue can be both more pronounced and harder to discover with B2B products or services, where the conversion to a paid customer may take 3 to 6 months or more. In this scenario, tracking the detailed sources of your leads in the Salesforce Sales Cloud is essential, so you can connect the offline sales, and know which online advertising produces the most conversions to revenue.


With an add-on Salesforce app like the CloudAmp Campaign Tracker, you can add many data points to your Leads and Contacts, such as the following:


  • Lead type (Campaign, Organic, Referral or Direct)
  • Campaign UTM parameters
  • Referring Site / Source
  • Keyword / Search Phrase
  • Ad click ID (Gclid / Msclkid)
  • First and Last visit information
  • What pages were viewed on your web site


Because this advertising data comes right into your Leads in Sales Cloud, it can be quickly used by both marketing and sales team members. Sales users can understand the products or services a lead may be interested in by viewing their path through your web site, as well as their search phrases that triggered an ad.


Marketers or Sales Operations users can view aggregate campaign data in Salesforce, to identify keywords that may be driving high volumes of leads that don’t convert. Sometimes the target audience for those ads is off, or there could be confusion with a keyword having multiple meanings to different audiences. 


Eliminating waste in online advertising is not to be underestimated — it can be a quick path to improving results, when budget is reallocated from underperforming to better performing campaigns.

Call Tracking for Salesforce

There are also Salesforce apps such as RingDNA and Call Tracking Metrics, which can both provide your business with a Salesforce integrated internet based phone system, while at the same time helping to track advertising results from phone calls.


These systems can dynamically display unique phone numbers on your website landing pages that are tied to particular campaigns or keywords, and sync that data to Salesforce when leads are created. 


Salesforce connected phone apps have a number of other features that can improve your sales team’s productivity as well, such as predictive dialing, automated emails and voicemails, and more.


Website Activity Tracking in Salesforce

Knowing which pages a Lead or Contact in Salesforce viewed on your website can be critical in understanding buyer intent. And the good news is that this is not just a feature of Salesforce Marketing Cloud, it is also available through lower cost add-on apps for Sales Cloud.


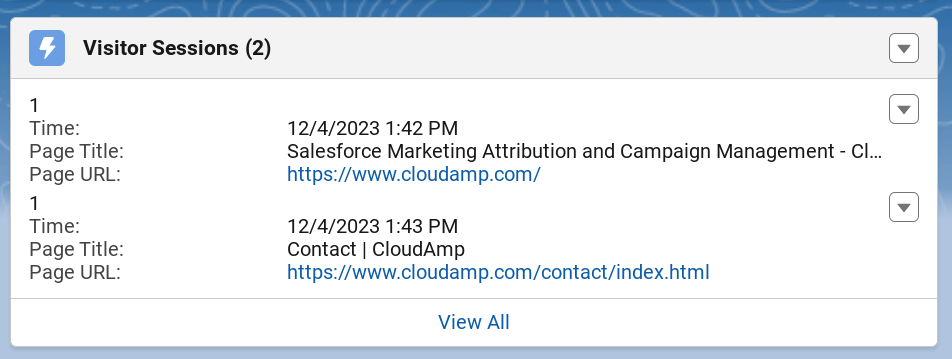
By combining the power of CloudAmp and Salesforce Sales Cloud, you can see the pages that a Lead or Contact viewed on your site — how they entered your site, which products or services they looked at, and which form they filled out to contact you.  All the website activity data is shown in a related list right on the Salesforce record.

There are also a variety of indicators that can help your team understand where a prospect is in the funnel, such as viewing a pricing page, or multiple return visits to your website. Each session can be viewed, with time stamps and page URLs to make understanding the signals easier.


You can even set follow up tasks for your sales reps based on website activity, or add leads to a campaign based on them downloading a certain piece of content. While it does not solve every challenge of understanding prospect behavior, it can give you an easy starting point for how to engage with a prospect.


Salesforce Email Marketing

While Salesforce Sales Cloud is not technically email marketing software, it does have a number of capabilities for sending emails that are built in. It may not give you all the features of a system like Marketing Cloud, or of standalone email marketing software like MailChimp or Campaign Monitor, but it is worth understanding its capabilities and whether they would work for your purposes.


Salesforce Sales Cloud includes the ability to send mass emails, email templates, and ways to create automations, but they are subject to some limitations. Its functionality for individual Sales or Service users to send single emails to customers is considerably more advanced, as this is core functionality of Sales Cloud.


Mass Emails

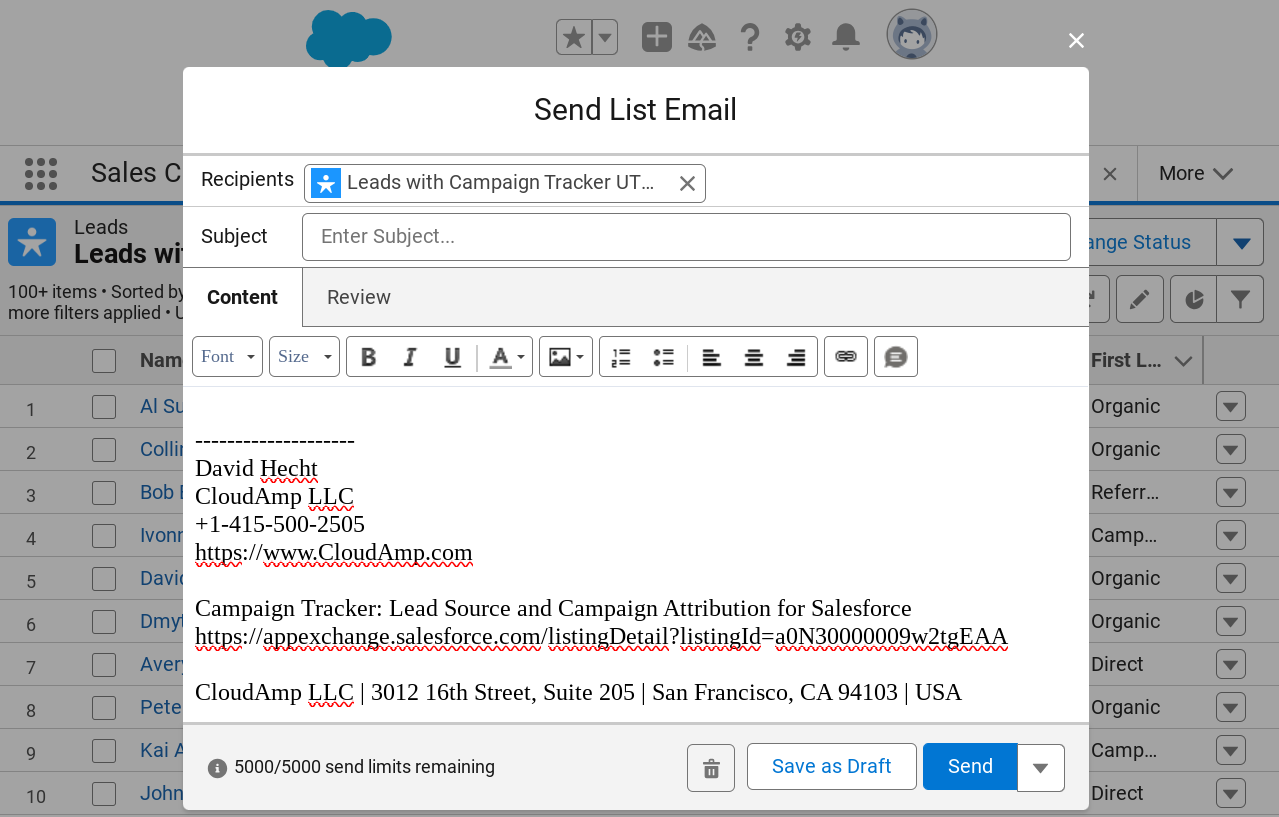
You can send mass emails from Salesforce, though the amount is limited to 5000 per day. Additional quotas may be available if you are relaying email through your own mail servers or Google Gmail / Microsoft Office 365 mail servers.


There are also some limitations to the data you get back. Email Opens can be tracked in most cases, but you will not be able to see click throughs on an individual basis.


If you are regularly sending mass emails, such as a monthly email newsletter to thousands of customers, you should consider using a third party email marketing application. You will have fewer restrictions around email quantities, and are likely to find the analytics that most email services provide to be valuable.


But Salesforce Mass Emails can be quite convenient, since you can select “Send List Email” from Lead or Contact list views at the click of a button.

Automated Emails

In addition to the Lead Auto-Response Rules covered above, to schedule automated emails in Salesforce Sales Cloud, using Flow automation is generally recommended. While flows are very powerful, they would typically require your Salesforce Administrator to configure, especially if you wish to do a drip email campaign (also known as a marketing automation journey). 


That can be implemented in Salesforce, but it would be a fairly advanced setup. Marketing Cloud Account Engagement (formerly Pardot) would likely be a better solution if you want to send lots of automated email journeys, and give your marketing team the ability to easily configure and update them.

Salesforce Sales Cloud does have other features that were used for sending automated or scheduled emails, such as Workflows and Process Builder, but those features are being phased out. At CloudAmp we do use Workflow email notifications to send internal emails, such as information on new leads or closed deal celebrations to the team.


Email Templates & Quick Text

Salesforce does have email templates that are useful for sending pre-written and formatted emails from Salesforce, either to individual customers or mass emails. There is not a drag-and-drop editor, like most Email Service Providers offer, so often you might need to build an email template externally, convert it to HTML, and then upload it to Salesforce.


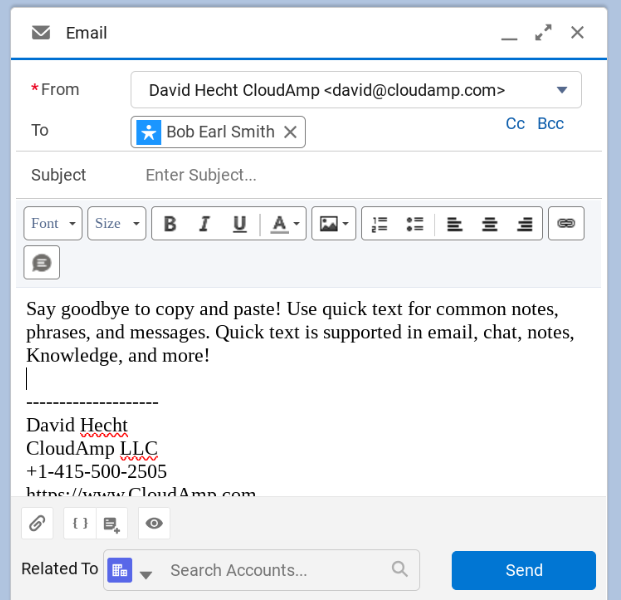
Another nice feature of the Salesforce Sales Cloud email toolset is Quick Text. These short blurbs can be inserted into any email using a button, and help make your team more efficient, as well as keeping replies or wording more standardized across your company.


Quick Text can be organized into folders by category or topic, giving your team easy access to pre-written responses. This feature is generally used in Sales or Service situations however, and not as frequently as a marketing tool.

Email Hygiene

Salesforce Sales Cloud does provide Bounce Management, to show you when an email address has bounced. It also has an Email Opt-Out field, which can be checked when you wish to exclude a Lead or Contact from future emails.


Unfortunately Salesforce does not have an unsubscribe function that can be added to the bottom of emails and allow customers to unsubscribe on their own. Your team would need to check the Email Opt-Out field manually when requested by your customer, or build additional functionality using a form to process unsubscribes. Unsubscribe functionality is another reason to consider a third party tool for mass email marketing purposes.


Conclusion

If you’ve made it this far, you can see that there is a lot of marketing functionality included in Salesforce Sales Cloud, as well as a number of add-on apps to extend functionality. Marketing Cloud is a good solution for many Salesforce customers, but its functionality isn’t a necessity or fit for all customers. And at the very least, it is worth understanding the breadth of marketing functionality within Salesforce Sales Cloud, so you can make a good decision on what tools to use, with or without Marketing Cloud.


Learn more about CloudAmp

Not yet a CloudAmp customer? If you want to have more data about your Leads in Salesforce, including full source attribution and page view data to prove ROI and improve your marketing, contact us for more information today.