This was originally a guest post on the Salesforce Blog.
Managing inbound leads is one of the areas where Salesforce shines brightest. But for small and medium businesses (SMBs), sometimes all the options and marketing software add-ons can seem overwhelming — too much money or too much work for your small team.
The good news is that you can build your very own “lead machine,” to improve conversion rates and grow your revenue, using tools that are mostly available already in Salesforce. Getting these lead management basics in place is not difficult, and can have an immediate impact on your bottom line. Here’s how to do it.
The first step to creating your lead machine is to establish a process for handling leads. I recommend writing this down in a short document, and making sure everyone agrees to the definitions and a common process. Even in a small team, it is common for different people to have varying opinions based on their personalities and prior experience, so best to get on the same page and have a written plan to refer to.
I am always amazed at how many Salesforce customers I see with a number of email addresses instead of a form on their “contact us” page or landing pages. If you have made an investment in Salesforce, make the change to your processes to funnel more inquiries through forms — otherwise you have a major “slip through the cracks” moment right at the start of your lead management process.
Salesforce’s Web-to-Lead technology is easy to implement, and leads go directly into your Salesforce organization, with no data entry required or danger of being lost in someone’s email box. Just go to the Web-to-Lead area of Salesforce setup, and do the following:
Salesforce has some advanced tools for processing and organizing incoming leads — start using them if you are not already. Even if you just have 1 or 2 sales people, set up a Queue to own incoming leads. Then create some assignment rules that give ownership of some or all of the new leads to the Queue. You can either manually assign/claim leads from the queue, or even automate assignment of some leads to users instead of the queue, depending on the variety of leads you receive.
Since you will now be using the Web-to-Lead forms, you can also have hidden fields with prepopulated values in them which define a lead source or campaign, or indicate which form on your web site(s) a lead submitted. Those values can be very useful in driving automated actions once the leads arrive in Salesforce. Create some email templates for autoresponders, and have tailored autoresponses sent to the leads depending on the values they have or how they are assigned when they come in.
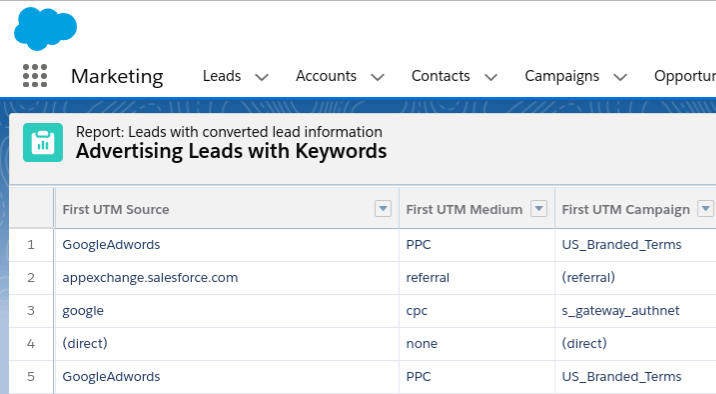
Branching out from the core Salesforce functionality, set up a tracking application that can provide additional information about where a lead came from. This is especially critical if you are spending money on Google Adwords or other online marketing, since you will want to know which advertising produced the best quality leads.
Tracking the source of your leads requires a separate app, as well as a small tracking code that needs to be placed on your web site. There are a variety of tracking apps available on the AppExchange, from CloudAmp’s straightforward Campaign Tracker to tracking capabilities in larger marketing apps like Hubspot or Salesforce’s Pardot.
Once you have your leads coming in via web-to-lead, being tracked, assigned and having autoresponders sent out, it is time to get visibility into your lead totals and trends with my favorite Salesforce feature, Dashboards. Having one or more lead dashboards in Salesforce can make it easier to visualize data, spot problems or successes, and quickly understand how your demand generation efforts are working at a high level.
Best of all, you don’t have to start from scratch – there are a variety of free dashboards available for download on the AppExchange that you can use as a starting point. Just install, “clone” the dashboards to make a copy, and “Save as” the reports when customizing so you retain the originals for reference.
For Enterprise Edition of Salesforce and above, you can schedule dashboards to be refreshed and emailed to you and other team members on a daily or weekly basis, for added visibility into your newly created Salesforce lead machine. This can be very valuable for raising visibility with executives or other team members who may not log into Salesforce daily, as well as a good way to personally check your lead machine status every morning in your inbox with a cup of coffee.
After your initial autoresponder Email from Salesforce when a lead comes in, consider putting an Email marketing program in place to cultivate your newly received leads. What type of email marketing program should be part of your Salesforce lead machine will vary widely depending on your target market and sales cycle.
If you are selling to technical buyers who are marketing averse, or your average sale takes just a week or two from lead to closed deal, you may not need much of an email marketing program at all. On the other hand, if your average sales cycle is 6 months, or your target audience is expecting to be educated about the need for your product, then a structured email marketing campaign over time is likely to be essential. There are a variety of tools available for email newsletters, drip email campaigns, and more. From cheapest / simplest to more expensive and full featured, some popular options are:
So there you have it, a complete demand generation and lead management machine in 6 easy steps. There are plenty of other options to explore, such as integrating data from web analytics or chat systems, lead scoring, and more, but these 6 basic areas should get you on the road to less chaos, more converted leads, and ultimately more closed sales.
Know where your best Salesforce leads come from, and track marketing ROI more easily.